I love to bake pies and when Williams-Sonoma released these pie molds last summer, well, I had to have them. Little pies, heart, star, apple or pumpkin shaped, couldn't be cuter. They're super easy and a fun toy worth the space they take up in my pastry counter. I made and rolled out the dough two days before I assembled them. One bonus of Chicago winters is the added freezer space the garage provides so they were easy to store.
I used some of the raspberries I picked last September. I gathered few simple pantry items to make up the filling. The cutouts are still a bit frozen here. Trial and error determined the pie dough needs to be cool room temperature. It'll crack if too cold, or stick if too warm. Buttering the molds helped a bit, too.
You don't, of course, need to have these space taking pocket mold to make cute little filled pies. Check out "save room for" in the February issue of Martha Stewart Living if you want more specific directions. I would cut the dough with a large cookie cutter of your choice. Proceed as with pie mold only use a bit of water on each crust edge to ensure a nice seal and gently press edges with a fork.
Place one piece of crust on the bottom of the mold. In this picture it's actually upside down - the pretty fluting should be on top crust. More trial and error I guess. I have a tendency to fill filled things with too much filling. I placed two moderately sized tablespoons into each pie hoping to prevent too much leaking.
I brushed on a bit of cream and sprinkled them with gobs of granulated sugar for sparkle.
They are adorable and super delicious. Wouldn't they the nicest treat for those you love on February 14th?
XOXOXO,
The Queen of Hearts
Summer Raspberry Pie Filling
annotated from Great Pies and Tarts
by Carol Walter
This is the filling recipe I made for these little hearts. There was extra that I put into ramekins and baked with a top crust of pie dough scraps. Equally delicious and easy, too.
6 cups fresh or frozen raspberries (if frozen, no syrup)
1 T. instant tapioca
3/4 cup sugar, or to taste
2-2 1/2 T. cornstarch
1 t. grated navel or Valencia orange zest
2 t. fresh lemon juice
Place berries in a large bowl. Toss with tapioca through orange zest until fruit is covered. Sprinkle with lemon juice and toss again.
Fill and press pie cut outs. Brush with glaze of your choice and generously sprinkle with granulated or sparkle sugar.
Bake approximately 35 minutes at 375 degrees.
One man, one woman, four kids, two dogs, flock of hens, hive of bees, lots of projects, too many hobbies, and much happiness in our yellow house
Sunday, January 31, 2010
Saturday, January 30, 2010
Food Rules
Eat Food, Not Too Much, Mostly Plants
Michael Pollan is my hero. His new book was cause for a visit with Oprah last week and I was so disappointed to have missed it. So....I went right out and bought the book.It's a great synopsis of his previous books, and just as its' title implies a book of rules, or more gently guidelines for eating well. This great read takes about an evening to complete and leaves you with a greater resolve to take make wise food choices and eat well.
Much of the book is particularly timely after our "Processed Food Project". Here are a few of my favorite, and humorous, rules....
#1 - Avoid food products containing ingredients that a third-grader cannot pronounce.
#2 - Don't eat anything your great-grandmother wouldn't recognize as food.
#3 - It's not food if it's called by the same name in every language. Think Cheetos and Big Macs.
#4 - Don't eat breakfast cereals that change the color of the milk.
#5 - Don't get your fuel from the same place your car does.
Read this book. Pat yourself on the back for all you already do. Challenge yourself to change the things you don't. You'll be really glad you did.
Meyer Lemon-Rosemary Olive Oil Cake
In the winter, Meyer lemons are usually pretty available at most stores. At Trader's Joe's last week I couldn't resist them so I brought home four and began the task of determining what to do with them. A recipe for a Lemon Rosemary-Olive Oil Cake seemed like a good place to plug in Meyer lemons. I am a sucker for sweets incorporating fresh herbs and using a healthful olive oil was interesting, too.
Meyer lemons are a cross between lemon and tangerine. Lower in acid than regular lemons, they have a more floral essence. These small, thin skinned fruits are a beautiful yellow orange when fully ripe. While I ultimately used all of the zest, leftovers are easy to save when left dry at room temperature. Once dry I'll put the zest in a tiny ziploc container and freeze it to retain freshness.
I have finally purchased the hand citrus juicer extraordinaire. Works well for large and small fruits and keeps any seeds out of the juice.
Fresh rosemary from the plant I brought in at the end of summer. Sometimes they do well in the house. This one not so much. The tablespoon I took, just might be the end of it. To me Meyer lemon has a evergreen flavor to so I reduced the original quantity to only a tablespoon so as not to overwhelm the cake. If using regular lemons, maybe try a bit more?
I used a full size traditional bundt pan, but a tube pan would work well, too. Before putting the cake in the oven, draw spatula in batter through the middle. Creating this channel encourages an even rise and more level cake bottom. If your bundt cakes appear to be floating, this is the trick to fix that.
A simple lemon icing and it's finished. It's not too sweet and the icing adds a nice touch. A perfect low fat treat at 3pm when you need a pick-me-up. This a great keeping cake that gets better as it sits....assuming there is any left for the next day.
Meyer Lemon-Rosemary Olive Oil Cake
adapted from Cooking Light, September 2009
for the cake:
Cooking spray
2 T. all-purpose flour (or cooking spray with flour)
13.5 oz. (approximately 3 cups) all-purpose flour
1 T. finely chopped fresh rosemary
2 t. baking powder
1/2 t. baking soda
1/2 t. salt
1 1/2 cup granulated sugar
1/2 cup fruity olive oil
1/2 cup fat-free milk
2 t. meyer lemon zest
1/2 cup meyer lemon juice
1/2 t. vanilla extract
3 large eggs
for the icing:
1 cup powdered sugar
1 T. meyer lemon juice
Pre-heat oven to 350 degrees
Weigh 13.5oz or lightly spoon 3 cups flour into a dry measure. Combine flour and next four ingredients (through salt) in a large bowl.
Place granulated sugar and next 6 ingredients (through eggs) in a medium bowl; beat with a mixer at low speed until smooth. Add to flour mixture and beat until blended.
Coat a 10" bundt or tube pan with cooking spray; dust with 2 T. flour. I don't usually use cooking sprays but to cut prep time and calories used one that included flour. If using cooking spray, spray pan immediatley before pour batter into pan. Allowing pan to sit after being sprayed can sometimes lead to the cake sticking. Draw a spatula through batter to create shallow channel.
Bake at 350 degrees for 35-40 minutes or until a wooden pick inserted in the center comes out clean. Cool in pan for 15 minutes on a wire rack and remove from the pan.
Cool completely on a wire rack. Combine powdered sugar and 1 T. meyer lemon juice and stir until smooth.
Drizzle glaze over cake. Garnish the cake with fresh rosemary sprigs to dress it up.
Wow! 1/16th of the cake has 265 calories.
Friday, January 29, 2010
Processed Food Project - The End
Well, we've reached the end of our week of processed food. There is still a meal of delicious chicken nuggets, but it'll be a casual affair with parts of the family away at the dinner hour. For all intents and purposes, it's a wrap. I thought I'd share some highlights and final thoughts.
Some of my favorites....
When asked what they missed most, Max replied, "food that wasn't frozen 30 minutes ago."
Also attributed to Max, "so, what exactly is this made of ?" and finally, "Twinkies really aren't that bad.".
Everyone unanimously agreed that they felt a little "bloated" after a meal of all processed food. A good observation from kids, I think.
Doug thought it was fun to revisit some childhood meals, though no one wants to eat this way all the time.
I appreciate the fact that they've all missed my homemade cookies.
Jake seems to have enjoyed the project the most. Go figure, he's 13. Having soda in the house has been a thrill for him. Ditto Doritos and HoHo's.
Henry has been a pill after school this week. Could it be the chemical laden lunches or just a fluke?
There are corn products of some type in every processed food on the shelves, but did you know so is MSG? It's good to be a perimeter shopper.
Now that's not to say it's been completely horrific. In fairness, there were some meals, or aspects that were a hit, beyond the Jell-O.
It wasn't delivery, it was DiGornio. The meal of the week, preferred by most diners.
Tater Tots. Say what you will. I love tater tots with lots of ketchup. Bar Louie in Chicago does a "Loaded Tots" appetizer. Haute bar food and worth every artery clogging calorie. We've even recreated them at home.
Ultimately, I think Max and I were the most......challenged by this week. Max was more open than I, I admit. Last night, I had a peanut butter and banana sandwich. However, in the end, it's always good to be open to opinions beyond your own.
And regardless of what you're eating, "if you are around the table with those you love, what you're eating shouldn't matter so much.", she said with........conviction?
Tuesday, January 26, 2010
J-E-L-L-O and Quinoa
Jell-o was the hit last night. Strawberry Banana with Fruit Cocktail in Heavy Syrup. Say what you will - I grew up on Jell-o and have a soft (jiggling?) place for it in my heart. I very seldom make it anymore, but it's a comfort food. We had Jell-o on the table a lot when I was a kid. For us it was a salad. Doug says it's dessert. What do you think?
Comments from the kids on the entree du jour included, "it tastes like fake cheese.", and "my stomach feels weird". Is it too soon to think I am gaining ground?
Yesterday afternoon, my covered cake plate was looked so sad and empty, I couldn't help but bake something. The kids may eat Cocoa Puffs, but I needed something more.
Prior to the project inception, I planned to make Quinoa-Fruit Muffins. A recipe from Martha Stewart, it's one of my favorite breakfast treats. I can make the quinoa the day before, even several days before. It can also be frozen for later use when recipes call but time is short. One uncooked cup will yield three cups cooked. Since this recipe only calls for 2 cooked cups, the third cup goes into a cereal bowl with a bit of brown sugar and some milk. A tasty protein-based breakfast for mom.
Quinoa includes all the essential amino acids making it a complete protein. These muffins make for a great breakfast or snack on the run. Not just limited to baking either you may use it as you would rice or pasta.
This muffin recipe has a canola oil base - making it super quick. Since it's so basic it's easy to make it your own, too. Ginger? Cardamom? Fresh raspberries? Apricots? Nuts? You name it.
The original recipe calls for 1/2 cup dried fruit. I like to add more, closer to a cup. I mix whatever I have in the house. Yesterday it was raisins, dried cranberries and chopped dried plums.
One recipe made 12 regular sized muffins and 12 minis. I love these unbleached paper cups. They're compost able, too
I ate two of the regular sized muffins for breakfast with a cup of coffee and feel full but not stuffed and completely satisfied.
Better than Cocoa Puffs any day.
Quinoa Muffins
Adapted from Martha Stewart Everyday Food
1 cup quinoa, rinsed
1/4 cup vegetable oil
2 cups all-purpose flour
3/4 c. dark brown sugar
1 t. cinnamon
1 1/2 t. baking powder
1 t. salt
1 cup dried fruit, larger fruits chopped
3/4 cup milk
1 large egg
1 t. vanilla extract
Pre-heat oven to 350 degrees. In a medium saucepan, bring quinoa and 1 cup water to a boil. Reduce to a simmer; cover and cook until water has been absorbed and quinoa is tender, 11-13 minutes.
Prepare muffin pan with liners or lightly grease and flour. In a medium bowl, whisk together flour, sugar, baking powder, cinnamon, salt, dried fruit and 2 cups cooked quinoa. Reserve leftovers for later use.
In a small bowl, whisk together oil, milk, egg and vanilla. Add milk mixture to flour mixture and stir until just combined; divide among prepared muffin cups.
Bake until a toothpick inserted into the center of a muffins comes out clean, 25-30 minutes. (minis took about 18). Cool in pan for 5 minutes and then transfer to a wire rack to cool completely. Store in an airtight container up to 5 days.
Comments from the kids on the entree du jour included, "it tastes like fake cheese.", and "my stomach feels weird". Is it too soon to think I am gaining ground?
Yesterday afternoon, my covered cake plate was looked so sad and empty, I couldn't help but bake something. The kids may eat Cocoa Puffs, but I needed something more.
Prior to the project inception, I planned to make Quinoa-Fruit Muffins. A recipe from Martha Stewart, it's one of my favorite breakfast treats. I can make the quinoa the day before, even several days before. It can also be frozen for later use when recipes call but time is short. One uncooked cup will yield three cups cooked. Since this recipe only calls for 2 cooked cups, the third cup goes into a cereal bowl with a bit of brown sugar and some milk. A tasty protein-based breakfast for mom.
Quinoa includes all the essential amino acids making it a complete protein. These muffins make for a great breakfast or snack on the run. Not just limited to baking either you may use it as you would rice or pasta.
This muffin recipe has a canola oil base - making it super quick. Since it's so basic it's easy to make it your own, too. Ginger? Cardamom? Fresh raspberries? Apricots? Nuts? You name it.
The original recipe calls for 1/2 cup dried fruit. I like to add more, closer to a cup. I mix whatever I have in the house. Yesterday it was raisins, dried cranberries and chopped dried plums.
One recipe made 12 regular sized muffins and 12 minis. I love these unbleached paper cups. They're compost able, too
I ate two of the regular sized muffins for breakfast with a cup of coffee and feel full but not stuffed and completely satisfied.
Better than Cocoa Puffs any day.
Quinoa Muffins
Adapted from Martha Stewart Everyday Food
1 cup quinoa, rinsed
1/4 cup vegetable oil
2 cups all-purpose flour
3/4 c. dark brown sugar
1 t. cinnamon
1 1/2 t. baking powder
1 t. salt
1 cup dried fruit, larger fruits chopped
3/4 cup milk
1 large egg
1 t. vanilla extract
Pre-heat oven to 350 degrees. In a medium saucepan, bring quinoa and 1 cup water to a boil. Reduce to a simmer; cover and cook until water has been absorbed and quinoa is tender, 11-13 minutes.
Prepare muffin pan with liners or lightly grease and flour. In a medium bowl, whisk together flour, sugar, baking powder, cinnamon, salt, dried fruit and 2 cups cooked quinoa. Reserve leftovers for later use.
In a small bowl, whisk together oil, milk, egg and vanilla. Add milk mixture to flour mixture and stir until just combined; divide among prepared muffin cups.
Bake until a toothpick inserted into the center of a muffins comes out clean, 25-30 minutes. (minis took about 18). Cool in pan for 5 minutes and then transfer to a wire rack to cool completely. Store in an airtight container up to 5 days.
Monday, January 25, 2010
The "Good" Stuff
I am one of "those moms". Denying my children the finer aspects of childhood. Sugar cereals are a treat for the weekend. There is never soda in the house unless it's a party. I put 100% juice or water in their Klean Kanteen. Lunchboxes have rules - protein, fruit and/or veggie, starch and A treat. I make cookies and only occasionally buy a box of Trader Joe's Jo-Jo's. Well, perhaps the Jo-Jo thing is just for my own waistline preservation. If you've ever eaten a Jo-Jo, you understand.
Last week Max and Jake were bemoaning the fact that they never get the "good" stuff. So I offered this idea. We'll buy all the "good" stuff for 5 days worth of meals. Fun cereal not quinoa muffins. Doritos not whole wheat pretzels. Fruit and veggie optional. Jake can even pack a can of soda. Perhaps naively, I thought after a few days, they'd be tired of the fun food and crave carrots. Oatmeal cookies WITH raisins would be welcome. Orange would be the clementines, not the Doritos.
I love to cook and feed people and for me meal prep is a pleasure. In today's busy world though, sometimes homemade meals can't be a priority all the time. For some lengthy meal prep is purgatory. Today, we embark upon the Processed Food Project. We'll see if my cookies are better than Twinkies. My hope is that they will be and they'll sing my praises. Then again, they are kids and it's hard to compete with a booty like this....
We are all going to share thoughts on this new approach to food and I'll post them here. My hope is that it will be a lesson for all of us. Perhaps we (ahem...I) need to learn moderation goes both ways and the humble carrot can be "good" stuff, too.
In the meantime, what can I cook for whom?
Sunday, January 24, 2010
I Want To Be Out Standing In A Field
A few weeks ago, I hit the Oak Brook Williams-Sonoma store and was excited to find a great deal (really great deal) on the cookbook, Outstanding in the Field by Jim Denevan. Mr. Denevan is the founder of Outstanding in the Field, an organization that sets up outdoor dinners wherever food is grown. Last summer, he hosted two dinners in Chicago, one in an urban garden. Unfortunately, the price tag was a bit prohibitive but something I've put on my life list.
In purusing my new book, I came across a recipe for Cider-Braised Pork Shoulder that sounded wonderful. I knew I could pick up a beautiful piece of meat at the Community Winter Market, from one of my favorite hog farmers. I like to be able to support our farmers, even in the off season, so I was glad to find a recipe that would allow me to do just that.
The first step is to score the fat and cut slits throughout the meat for aromatics. In each slit I stuck a sage leaf and/or a sliver of a garlic clove. Now it's ready for the pan.
I think one of the most important parts of a good braise is a great sear on the meat. Caramelization of the natural sugars provides depth of flavor, on the meat and in the fond in the pan.
Carrots, onions, celery and garlic are quickly sauteed. Then the pork along with chicken stock and hard apple cider are added to the pan. All brought to a boil, then allowed to simmer in the oven for 2 to 3 hours.
After braising, the soft vegetables and braising liquid is put through a food mill to create a rustic pan sauce. (perfect for Henry since he was none the wiser) Not a bit of flavor is lost. If you prefer a thinner sauce, add a bit more stock.
While the plate is dull and dark, sort of like the weather in Chicago, which doesn't allow for beautiful pictures, it was a wonderful meal! Chunks of tender, flavorful pork, hand mashed potatoes with a bit of garlic and sauteed cabbage and onions.
I am so excited to do more from the book - especially with produce from my own garden this summer. In the meantime, I'm going to save my change and hope for enough to someday be out, standing in a field, eating super fresh food with Jim Denevan.
Saturday, January 23, 2010
Saveur 100 - 2010
I love Saveur magazine and this issue is my favorite. My subscription may lapse but I am always sure to pick up the January/February issue from the new stand. Obviously, the beginning of the new year is the time for such an issue, but the timing is especially great since the doldrums of winter are beginning to settle in. Perfectly timed inspiration.
What are my favorites this issue? Here are just a few....
#2 - Eggs From Your Own Chickens. Nothing like a really fresh egg. I'd love to have a few girls in my own yard. Someday.
#11 - Tastespotting.com. A cool site where you can download your own food photos and include recipes. Move over epicurious.com.
#21 - Rapini. Love it. It deserves some good press.
#24 - Italian Plums. Reminded me of a great day at the Green City Market last September.
#26 - Prehaps my favorite new find, TheFreshLoaf.com. A great source for the home bread baker and all things bread. My favorite cozy winter thing.
#30 - Tuna Melts. Sorry, I love 'em.
#39 - Homemade Egg Noodles. On my list of "to-do".
#50 - Turning Forks. I have one of my Grandma's "granny forks". Nostalgia is always good.
#52 - Talula's Table. I heard about it on NPR. I'd love to go.
#54 - Cooking Under a Brick. How cool do I feel for having done at a class a year ago? Offering it again this year.
I skipped a few on the way up (#10,#37, #48) and then there is #66, #76.....
Trust me, get yourself a copy. Soon.
Wednesday, January 20, 2010
Spanish Almond Brittle
I love smoked paprika and it's an ingredient that too often sits in my pantry for a rare recipe. Recently I came across a couple recipes that call for this great flavor. Most often, I think of paprika in savory preparations but when I saw this brittle recipe I was intrigued. The only problem was the dulce paprika - mine is picante. What the heck? I'll give it a shot.
The process for brittle is similar to the caramels I posted before but cooked to 335 degrees Again, a good time for a quality candy/oil thermometer. The salt and paprika is added at the end of the cooking process, so have it pre-measured at the ready so there's no risk of over cooking.
Dumped onto a heavy jelly roll pan lined with my silpat and set to cool completely. This will take an hour or two depending upon the temperature of the room.
Waiting, waiting, waiting. The kids were chomping at the bit to try it!
Once it's cool, break it into chunks. Less sweet than most brittle, pleasantly smoky with a little heat at the finish. It's a perfect bite, with a beer and equally addictive any given afternoon.
Spanish Almond Brittle
Butter, for pan or a Silpat mat
2 t. picante smoked paprika
1/4 t. salt
3 cups sugar
1 cup water
2 T. light corn syrup
2 cups blanched slivered almonds, lightly toasted
Lightly butter a 10x15 jelly-roll pan or line with a silpat mat. In a small bowl, stir together the paprika and salt; set aside.
In a medium saucepan over medium-low heat, stir together sugar, water, and corn syrup until the sugar is completely dissolved, about 5 minutes. Increase the heat to high and boil without stirring until the syrup is golden brown (about 335 degrees on a candy thermometer), 5-10 minutes. When the sugar begins to brown around the edges of the pan, swirl the pan gently so that it caramelizes evenly.
Remove from the heat and carefully (the mixture will bubble up) stir in the almonds and paprika mixture. Immediately pour into the prepared pan. Let stand at room temperature until cool and hard, about 1 hour.
If buttered bend the ends of the pan to release the brittle. If using a silpat mat, merely lift the candy off the pan. Break into chunks.
Store at room temperature in an airtight container for up to 2 weeks.
Tuesday, January 19, 2010
Parsnips, Please!
Ahhhhh, parsnips. I mentioned this new love affair a few days ago. Inspired by a parsnip puree scented with 5 spice powder I had at Moveable Feast, I made a puree of my own for our Christmas dinner. Parsnips and pears cooked in cream and finished with a splash or two of dry sherry. It was looked upon warily by the entire family. Heavenly, is an understatement and it was liked, even by the most cautious of the bunch.
My 2010 resolution (Should I say one of them or would that be a total falsehood?) is to experiment and inspire others to experiment with new vegetables that have been passed by for years. Besides, who isn't sick of broccoli by February 1st? I've experimented with celery root, green cabbage, pascal celery, fennel and, of course, the lovely parsnip.
I needed to do a demo at the Community Winter Market a few weeks ago. Demos in the winter can be a bit challenging, when working with local food in Chicago. Parsnips, perhaps since they're my new fav, seemed like a good ingredient to focus on. Why not a quick bread?
I decided to use some walnut oil I had in the fridge in place of a more basic canola oil.
A handful or two of coarsely chopped walnuts.
Since I doubled the recipe, I used an ice cream scoop to equally divide the thick dough between the two pans.
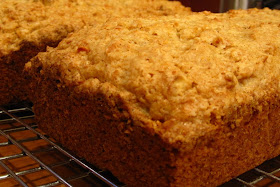
Out of the oven, it looks, well, basic. It's a tasty if simple spice bread and received many recipe requests. Always a good sign. I noticed as the leftovers aged, the flavor of parsnips became more pronounced. It made this basic loaf more complex and even better. Now, unfortunately, since there isn't much in the way of knock out nutrients in parsnips, this isn't going to be considered a "superfood" any time soon.
What makes this recipe worth trying is that it's made with an unusual vegetable. Sometimes the unusual all you need for a gratifying day in the kitchen.
1 1/2 cup all purpose flour
3/4 t. baking powder
1/2 t. cinnamon
1/4 t. cloves
3/4 t. salt
1 cup sugar
1/2# (2 medium) parsnips, peeled, cored and finely grated
1/4 cup walnut oil
1 egg, lightly beaten
1/2 t. vanilla extract
1/2 cup walnuts, coarsely chopped
Preheat oven to 350 degrees. Lightly butter an 8x4 bread pan.
Stir together flour, baking powder,salt, cinnamon, cloves and salt in a medium bowl.
In a separate bowl, mix together sugar, walnut oil, egg and vanilla extract then fold in parsnips. Gently stir flour into parsnip mixture. Gently stir in walnuts.
Spoon into prepared pan and bake for 55-60 minutes or until a knife inserted into the center of the loaf comes out clean.
Cool in the pan on a wire rack.
My 2010 resolution (Should I say one of them or would that be a total falsehood?) is to experiment and inspire others to experiment with new vegetables that have been passed by for years. Besides, who isn't sick of broccoli by February 1st? I've experimented with celery root, green cabbage, pascal celery, fennel and, of course, the lovely parsnip.
I needed to do a demo at the Community Winter Market a few weeks ago. Demos in the winter can be a bit challenging, when working with local food in Chicago. Parsnips, perhaps since they're my new fav, seemed like a good ingredient to focus on. Why not a quick bread?
I decided to use some walnut oil I had in the fridge in place of a more basic canola oil.
A handful or two of coarsely chopped walnuts.
Since I doubled the recipe, I used an ice cream scoop to equally divide the thick dough between the two pans.
Out of the oven, it looks, well, basic. It's a tasty if simple spice bread and received many recipe requests. Always a good sign. I noticed as the leftovers aged, the flavor of parsnips became more pronounced. It made this basic loaf more complex and even better. Now, unfortunately, since there isn't much in the way of knock out nutrients in parsnips, this isn't going to be considered a "superfood" any time soon.
What makes this recipe worth trying is that it's made with an unusual vegetable. Sometimes the unusual all you need for a gratifying day in the kitchen.
1 1/2 cup all purpose flour
3/4 t. baking powder
1/2 t. cinnamon
1/4 t. cloves
3/4 t. salt
1 cup sugar
1/2# (2 medium) parsnips, peeled, cored and finely grated
1/4 cup walnut oil
1 egg, lightly beaten
1/2 t. vanilla extract
1/2 cup walnuts, coarsely chopped
Preheat oven to 350 degrees. Lightly butter an 8x4 bread pan.
Stir together flour, baking powder,salt, cinnamon, cloves and salt in a medium bowl.
In a separate bowl, mix together sugar, walnut oil, egg and vanilla extract then fold in parsnips. Gently stir flour into parsnip mixture. Gently stir in walnuts.
Spoon into prepared pan and bake for 55-60 minutes or until a knife inserted into the center of the loaf comes out clean.
Cool in the pan on a wire rack.
Monday, January 18, 2010
Butterscotch Caramels
Who doesn't love candy? Good candy. Candy with fresh, pronounceable ingredients. I am not talking Skittles, Lemonheads and Nerds. Always a chocolate fan, the older I get, it's all about caramel.
I love butterscotch, too so combining them was reeeaally appealing. These caramels are the best I've every made. I'd spread their soft and gooey goodness on toast.
Caramels are super easy to make. Especially if you have a good tools. A heavy bottom pan, silicone spatula and good quality digital oil and candy thermometer. Check here for one like I have. This thermometer makes hot sugar a walk in the park.
What makes these caramels butterscotch? Dark brown sugar rather than granulated. Other than that the basics - butter, corn syrup, cream and water.
Bring it all to a boil and then allow to cook to a temperature of 245-250 degrees, depending upon the texture you like. We like them soft so I cook them to the lower temperature. If you prefer them firm take them up to 250 degrees. Once they reach the preferred temperature remove the pan from the heat and stir in the vanilla extract. Don't be surprised when it bubbles up...a lot !
I lined a heavy 8" square metal (not glass) pan with buttered heavy duty (make sure it's heavy duty) aluminum foil. It works but easiest for this is a disposable aluminum pan, especially if you like softer caramels. They dump right out in a square and you can cut and wrap them all at once. Again, if you like the softer caramels, I suggest cutting the square into quarters and working on smaller quantities at a time. Soft caramels, as you can imagine, spread quickly.
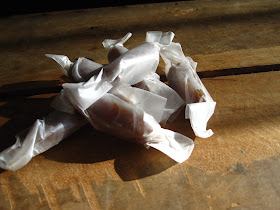
Here they are - wax paper wrapped goodness. Break out of the candy box and give caramel for Valentine's Day this year.
Butterscotch Caramels
yet again, a source I can't recall
3/4 cup unsalted butter, plus more for the pan
2 1/4 cups packed dark brown sugar
1 cup light corn syrup
1 cup whipping cream
1/2 cup water
1 T. lemon juice
1 t. salt
1 T. vanilla extract
Generously butter the sides and bottom of an 8" square aluminum cake pan. Place the pan ona baking sheet for stability.
In a large pot over medium-low heat, stir together the sugar, corn syrup, cream, 3/4 cup butter, water, lemon juice and salt until the sugar is dissolved and the butter is melted. Increase the heat and boil stirring occasionally with a heatproof spatula, until the mixture is golden brown and measures 245-250 degrees on a candy thermometer, about 10-15 minutes. Remove from the heat and carefully stir in the vanilla extract.
Immediately pour the caramel into the prepared pan. Let stand at room temperature until top is set, about 20 minutes, then refrigerate (still on baking sheet) until firm enough to cut, about 2-3 hours.
Tend back the sides of the pan and invert to release the caramels onto a cutting board. Use a sharp knife to cut the caramels into 1" squares. Wrap each piece in a square of wax paper and store them in an air tight container in the refrigerator for up to 2 weeks. The caramels taste best if you bring them to room temperature first.
I love butterscotch, too so combining them was reeeaally appealing. These caramels are the best I've every made. I'd spread their soft and gooey goodness on toast.
Caramels are super easy to make. Especially if you have a good tools. A heavy bottom pan, silicone spatula and good quality digital oil and candy thermometer. Check here for one like I have. This thermometer makes hot sugar a walk in the park.
What makes these caramels butterscotch? Dark brown sugar rather than granulated. Other than that the basics - butter, corn syrup, cream and water.
Bring it all to a boil and then allow to cook to a temperature of 245-250 degrees, depending upon the texture you like. We like them soft so I cook them to the lower temperature. If you prefer them firm take them up to 250 degrees. Once they reach the preferred temperature remove the pan from the heat and stir in the vanilla extract. Don't be surprised when it bubbles up...a lot !
I lined a heavy 8" square metal (not glass) pan with buttered heavy duty (make sure it's heavy duty) aluminum foil. It works but easiest for this is a disposable aluminum pan, especially if you like softer caramels. They dump right out in a square and you can cut and wrap them all at once. Again, if you like the softer caramels, I suggest cutting the square into quarters and working on smaller quantities at a time. Soft caramels, as you can imagine, spread quickly.
Here they are - wax paper wrapped goodness. Break out of the candy box and give caramel for Valentine's Day this year.
Butterscotch Caramels
yet again, a source I can't recall
3/4 cup unsalted butter, plus more for the pan
2 1/4 cups packed dark brown sugar
1 cup light corn syrup
1 cup whipping cream
1/2 cup water
1 T. lemon juice
1 t. salt
1 T. vanilla extract
Generously butter the sides and bottom of an 8" square aluminum cake pan. Place the pan ona baking sheet for stability.
In a large pot over medium-low heat, stir together the sugar, corn syrup, cream, 3/4 cup butter, water, lemon juice and salt until the sugar is dissolved and the butter is melted. Increase the heat and boil stirring occasionally with a heatproof spatula, until the mixture is golden brown and measures 245-250 degrees on a candy thermometer, about 10-15 minutes. Remove from the heat and carefully stir in the vanilla extract.
Immediately pour the caramel into the prepared pan. Let stand at room temperature until top is set, about 20 minutes, then refrigerate (still on baking sheet) until firm enough to cut, about 2-3 hours.
Tend back the sides of the pan and invert to release the caramels onto a cutting board. Use a sharp knife to cut the caramels into 1" squares. Wrap each piece in a square of wax paper and store them in an air tight container in the refrigerator for up to 2 weeks. The caramels taste best if you bring them to room temperature first.
Saturday, January 16, 2010
Honey Preserved Clementines
Clementines are winters saviors. Purchased in bulk, inexpensive, great in a lunchbox, a breeze to peel and so easy to eat instead of that cookie that you've been eyeing all day. I always have a bunch of them around and even put bowls of them in the living room for a punch of color on a gloomy day.
The January/February issue of Fine Cooking has tons of interesting things in it, one of which is a recipe for Honey Preserved Clementines. I love preserved orange peel and had a jar of local honey that I knew would be perfect for this project.
The fruit is cut into thick slices, about two plus the thin ends. Into the pot, cinnamon stick, clove, green cardamom, honey, sugar and water and brought to a boil making sure the sugar is dissolved. It took me several days to make this recipe because I needed to get to the Spice House for green cardamom. Ultimately, my patience ran out and I substituted cardamom seeds. 12 cardamom seeds can be substituted for 1 green cardamom pod. I do think the green pods are much prettier than the seed in the final product but that's a fine detail.
Once the syrup is ready, the fruit is gently slipped into the pot.
After steeping overnight, into a jar with the whole spices and syrup.
The fruit should rest in the fridge for a week before eating. It's well worth the wait.
Aren't they beautiful? Stir them into rice pudding(!) or yogurt, top vanilla ice cream, decorate a cake, brighten a beef stew. This recipe can be made with Meyer lemons, too. I just happen to have some in the kitchen......
Honey-Preserved Clementines
Fine Cooking January/February
1 cup honey
1 cup granulated sugar
5 whole cloves
2 green cardamom pods
1) 4" cinnamon stick
1 1/2 # firm clementines (5-7), cut horizontally into 3/4" slices
In a 4 quart saucepan, bring cup water and the honey, sugar, cloves, cardamom, and cinnamon stick to a boil over high-heat.
Gently slip the clementines into the liquid without stirring, (if any slices are mostly rind, place them rind down.) Return to a full boil, and then reduce the heat to low, cover and simmer for 10 minutes. Remove the pan from the heat, cover, and set aside overnight, at least 8 and up to 12 hours.
Spoon and gently pack the slices into a 1-quart canning jar. Bring the syrup in the saucepan back to a boil over medium high-heat; boil 3 minutes to concentrate the flavors.
our the syrup over the slices to cover; discard an excess syrup. Cool to room temperature. Seal and refrigerate for at least 1 week before using. The clementines will keep in the refrigerator for up to 3 months.
Yield: 1 quart
Variations: Substitute 1 1/2# seedless thin-skinned oranges, seeded Meyer lemons or seeded tangerines.
Friday, January 15, 2010
Remembering Angel Food Cake
Jake loves angel food cake and I've been meaning to make one for him for quite awhile. Yesterday was the day, and above are the results. Honestly, it was made from a mix I picked up at Williams-Sonoma so the process was not so much the pleasure as was making a longed for treat for my son. I whipped it up, baked it and left it on a rack upside down to cool. I won a cake walk at the Tolono Fourth of July Celebration once. It was angel food.....and ALL mine. Sure I shared, but it was ALL mine. I love cake walks.
When I began to remove it from the pan and the distinct aroma only an angel food has tickled my nose, I started thinking of Aunt Maxine. Everyone called her Mac, and she was married to my maternal grandfather's brother. Ding, I think his given name was Dwayne was the barber in town and when we visited his shop, he'd always slip us a treat. I remember Aunt Mac coming to visit one day. She had her big patent leather purse in tow, and from it pulled fives for my brother and I. The gift came with the admonishment not tell our grandparents, making the gift so much more delicious.
Back to cake. Aunt Mac was notorious for baking angel food cakes for birthdays. Living in a small central Illinois town, back when everyone knew everyone, it's practical to think that much of town benefited from her baking. I can still remember her arriving at my grandma's with an angel food, drenched in pink icing with lots of color bleeding sprinkles. Squishy and sweet, it was delicious. A thoughtful, simple gift made with love.
I always savor food memories and make a quick box cake something extra special.
Thursday, January 14, 2010
What's Cooking In The Yellow House
Last night after spending an entire day in the kitchen I thought it would be fun to show a collection of what I've been cooking. Some recipes may turn up in their entirety later but for now here is just a taste.
Bad news first. Plain white rolls from Kneedlessly Simple. Let just say, it wasn't. The method is tedious and the results were just okay. Then again, they were only on the table for 30 seconds but are homemade rolls every really bad? Still, I won't be baking from this book again.
I have found that I love parsnips. For Christmas I made a puree with pears, cream and sherry. It was amazing. I love them in all forms and have a surprising recipe to share later.
Spotted these Honey Preserved Clementines in the December/January Fine Cooking. A fun and easy project. Great gift. More on these coming soon, too.
I love fennel and when I came across a recipe for Creamy Baked Fennel it was a must do. With cream and basic pantry items you'll have a simple yet decadent side dish. We had it with Garlic Roasted Chicken last night. Delicious!
A simple Cranberry Cake with Vanilla Crumbs. This was for a friend. If you give birth you should always get a cake.
Braised Short Ribs. The perfect meal on a cold winter day. It was a two day recipe but really simple preparations and well worth the time. I added some carrots in the final hour and served it on Celery Root and Potato Puree. As good as the beef was I think the puree was my favorite part. The kids loved it, too.
That's what is new in the yellow house kitchen. I hope I've inspired you or at least given you a creative boost on gray winter day.
Creamy Baked Fennel
I can't remember where I found the recipe from which this is adapted.
salt and pepper
2 large bulbs of fennel, cored and cut into strips
2T. chopped fennel fronds
1 c. heavy cream
1 t. fennel seeds
1 t. grated lemon peel
1 c. parmesan cheese
Preheat the oven to 450 degrees.
In a saute pan, bring 3/4 cup of water to a boil with 3/4 t. salt and 1/4 t. pepper. Add the fennel bulb strips, cover and cook until softened, about 5 minutes. Uncover and cook, stirring frequently until the water has evaporated, about 2 minutes. Toss fennel with a 1/4 cup of parmesan cheese and put in a small baking dish in one layer.
In a small saucepan, bring the cream to a boil over medium-high heat and reduce by 1/3 cup. This will take about 3 minutes. Add the fennel seeds and lemon zest, cover and let steep for 3 minutes. Strain infused cream through a fine mesh sieve over fennel. Sprinkle with 3/4 cup parmesan cheese.
Bake until bubbly and brown on the top, about 15 minutes.
Allow to rest a couple of minutes, sprinkle with fennel fronds and serve.