Showing posts with label winter. Show all posts

Wednesday, April 4, 2012

Winter Market Score


Who says you can't get cool stuff at a winter market in the Midwest?

Earlier this year, one of my favorite vendors had some ginormous yellow citrus fruits. I asked what they were, while simultaneously digging for money. Ponderosa Lemons, a hybrid of lemon and citron had found their way to my market. This slow growing tree had lived in this generous grower's green house for 20 years and she was sharing this wealth of unusual citrus.

I bought as many as I could, without being piggish and without a clue what wonderful thing I would do with them. It immediately became clear my food project needed to be one utilizing all of the the fruit, not just the juice. I wanted to taste them in different ways. Preserving the flavor to enjoy it for a long time would be a bonus. Who knows when this gem would come my way again?

I started with candied citrus. Though you may think it lame, it's one of my favorite treats since a childhood. With the fruit I made my first marmalade incorporating oranges and pomelos  (more on that soon.)


It's a truly simple project and may be made with any type of citrus. You'll find a recipe most anywhere. This one is more traditional but a version like this would be fun in the rosemary-lemonade cake suggested by the same cook. They fancy-up a simple cake like this yellow house blast from the past, too.


A toss with superfine sugar makes them sparkle.


The security of a jar full.


The pleasure of a handful.

Tuesday, March 13, 2012

Immunity Solution

Back when my beloved Borders was closing I scored Homemade Soda by Andrew Schloss. After  playing with some root beer and concocting my own herbal sodas last summer this tome of 200 recipes, well, you can imagine how excited I was at the prospects. The first one I attempted, Immunity Solution is nothing like the infamous cure-all, cod liver oil and way less sugar-y than Emergen-C. Full of vitamins A and C, beta-carotene, bioflavnoids and polyphenols you need this as you battle the balance of cold season.


Here we go....pay attention cuz this is really involved. Throw your whole fruit - this recipe calls for blueberries - and juice along with a bit of sweetener, in this case honey, into a pan.


Add a squeeze of citrus for brightness.


Mash the berries to to release flavor then sprinkle over a bit of fresh ginger and cinnamon.


Heat the mixture slowly over low heat, stirring often so the berries release their juice then allow this potion to sit at room temperature before straining through a fine mesh sieve. Discard the solids and store the syrup in a mason jar so it's always at the ready. Pre-mixed in an up-cycled bottle it makes a great gift for under the weather friends. They'll lub you.


You'll never buy soda again. (except for Pepsi Throwback because, my world would be dim once a month without it). I've also found this healthy habit is really, really good with true ginger beer as an afternoon pick-me-up.

I am also certain the addition of your favorite clear libation would make for a terrific cocktail - with health benefits. Remember these are not just for sickness but in health, too. You'll never look at a cold the same way again.

Achhoooo! Is it 5 o'clock?

Immunity Syrup
Homemade Sodas by Andrew Schloss

1 pt. blueberries or elderberries (I used blue)
1/2 c. carrot juice, preferably fresh
1/2 c. unsweetened purple grape juice
Juice of 1/2 a lemon
1/2 c. honey
1 cinnamon stick, broken into small pieces
1" length of fresh ginger root, coarsely chopped

Combine the berries, carrot juice, grape juice, lemon juice and honey in a small saucepan. Mash the mixture with a vegetable masher (or the back or a spoon), then stir in the cinnamon and ginger. Heat over low heat, stirring often, until the berries have released their liquid. Let cool to room temperature, and strain. You should have about 2 cups of syrup.

This syrup can be stored in the refrigerator for up to 2 days. (though I keep it longer)

Enough for 3 servings

To mix with seltzer:
2/3 c. immunity syrup
2/3 c. seltzer

Pour the syrup in to a tall glass. Add the seltzer and stir just until blended. Add ice and serve.

Yield: 1 serving.

Cheers to health!

Tuesday, February 28, 2012

The D

I seem to collect anything with a "D" on it. Blocks, postcards, ceramic plaques, framed pictures. They are everywhere in the yellow house. Though I don't think they are obnoxious pleasantly tucked away - perhaps it's getting a bit compulsive. Oh, well.

 Earlier this winter, I was inspired by Pinterest (duh) to make a cute "D" for my door. A cheap unfinished wooden "D" coated with red paint from a bygone project, a berry garland and Tacky Glue. (How did we live before Tacky Glue?)


The most challenging part of this project is getting the super thick glue out of the bottle. My Tacky Tip? Setting the bottle upside down in a glass between squeezes. This simple trick takes away a lot of frustration. Especially for kids accustom to the constant and unstoppable flow provided by Elmer.


Using old craft scissors to cut through garland wires, cut off mid-sized clumps and randomly glue them on. Be sure to keep the edges flush so the letter is clear from a distance. Layer to create a cohesive look. Don't worry about the glue - it dries clear. Sturdy berries are key.


Tah-Dah!


A big red ribbon for hanging and I have perfect winter decoration for my front door. What if your name begins with "N" or "H"?  Evenly measure a ribbon for each side of the letter and us a staple gun to affix it securely.

With the advent of spring I want to make another one.

I am thinking moss.

I am also thinking I need to get off Pinterest.

Sunday, November 27, 2011

Cake in a Can

Cake is my favorite food. In any shape. In any flavor. Cakes me supremely happy. Supremely. Now that's happy.

When working on my kitchen gifts class for nourish I came across some inspiration via Martha. Big surprise. Cake in a can. Come on.

I also love to recycle tin cans. Remember? How does she get into my head?

Could cake in a can get any better as a sweet gift? Yes. There is beer in it. We're so in tune - Martha and I.

Simple would be an understatement. An easily  tossed together quick cake full of pantry spicy goodness...and stout. Generously buttered 19oz. cans are the baking vessel.


In my excitement to do this project, I grabbed 4 pop-top cans of soup. Without thinking, the proper size was procured but see that little rim? Trouble.


When I explained my situation to my dear in-need-of-distraction-friend Kelli, she directly asked, "Will they come out?" My direct response was "I have no idea."  Long story short they did not and it didn't matter much because I dug them out and ate them anyway. Call it a purposeful illustration for class attendees. Call it an unthinking oversight. Whatever. It's cake.


Per Martha the cakes are removed from the cans, the cans washed and dried and then the cakes are returned to the can for giving. The show must go on and I made my tasty cakes darling for giving. A simple parchment circle punched with a $1 star stamp with a bright green rubber band to secure it. The other can I wrapped in scrapbook paper and placed in a cello bag with a cute handmade tag.

Let's return to the issue of cake. This cake tastes like Christmas. If there were an official taste of Christmas this is it. Really. Plus it's cake. AND it's baked in a can.

First, buy the right kind of can.

Then, read this great blog by a baker with cans of the right size.

Happy Christmas Cake!

Thursday, October 27, 2011

Piles of Plums for Cordial

I know, I know. Plum season lasts about 5 more days. (if you will) Though time is limited, if you can still find them, this delicious sip is worth it on a cold night and the perfect Christmas gift. I bought a ton of plums this season - my fruit compulsion raises it's ugly head....again.

Before their delicious transformation, they were stunning in a vintage orange bowl on the dining table. Lovely.


I decided to make a wine cordial with part of the booty. The appeal of this recipe is allowing the crushed fruit to macerate with the sugar in the fridge for a day. I think I may have taken two with no ill results. As I've said before the multi-step/day processes suit my life perfectly and allow me to attempt things I might other wise pass up.


A bottle of red wine poured into the sweetened fruit and a cup of brandy rounds out the mixture. Back into the pickle jar (Uh, I mean aging container) Thank goodness Grandpa buys the "jumbo" jars of dills for the kids.


Let the fruit infuse the liquid for a few weeks. Once it's done, strain the solids through a sieve gently pressing so you don't lose a drop. An extra straining through butter muslin ensures no bits of pulp in the finished product.


The amethyst color is divine. Sweet and smooth. It warms you to your toes. Before too long we'll really want our toes warm.


Hurry! Go! Buy plums!

Plume Wine Cordial

2 1/2#  plums, pitted and coarsely chopped
2¼ cup sugar
1 bottle of fruity red wine
1 cup brandy

Mash plums and sugar together dissolved. Add plums and all other ingredients to a large jar (pickle size is good) and allow to age for 3 weeks. Shake the jar several times during the resting time. Strain the liquid through a sieve, gently pressing on the solids to extra as much liquid as possible. Pour cordial through a funnel lined with butter muslin in to a clamp top bottle. Let it rest another several weeks. The longer you wait the better it is. An early nip is okay, too.
 

Wednesday, February 9, 2011

Mother Says Eat Your Citrus

I am a big proponent of eating seasonally and locally but I freely admit there are somethings I can't imagine not having all year long. Lemons for example, not even worth discussing giving them up to achieve "locavore" status. I got to pondering this as I snapped the final pictures of my latest "blog worthy" recipe.

Mother Nature really has everything down pat. Think about a beautiful beefsteak tomato, sliced and lightly salted, not a grocery store tomato but the homegrown kind. If it were possible to have a still warm garden tomato in the clear white light of a Chicago land winter would it taste as good?

Part of the joy of seasonal eating is the anticipation. The hot sun beating down as you select the perfect tomato from the farmer you missed all winter, makes it taste even better. The just warm breeze of spring only magnifies the first sweet bite of a tender strawberry. As I look out onto several feet of snow, I won't argue the thoughts are delicious, but the anticipation is better. Winter is hearty and substantial. Winter is bright citrus.


Interesting produce fascinates me. I want to bring it home and figure out something unusual to do with it. Recently, two pints of rather costly kumquats found their way to the yellow house. Perhaps as a follow up to last year's Honey Preserved Clementines, I bring you Kumquat-Riesling Sauce.

The method is straight forward and one you've seen here many times before. I love to cook up a pot of fruit and spice and see what happens. This recipe won't disappoint. How can it with vanilla bean, cinnamon and honey?

Riesling with just a bit of water.

Fresh ginger warms but doesn't bite. I always use a "lunchbox spoon" to peel fresh ginger. The thin edges of an inexpensive teaspoon make peeling ginger easy while still leaving the flesh in tact.

Bring the liquid to a boil, add 1/8" slices of kumquats and leave it on easy heat until the fruit is translucent and syrupy.


From the moment I saw this recipe, I knew I would love it. The dichotomy of sweet and bitter is always appealing to me. The spicy warm richness of the syrup and bright bitterness of citrus rind. Amazing.


What's even more amazing would be if you were to put it on vanilla ice cream and watch a repeat of Top Chef in the middle of a Wednesday afternoon.


I really need to try that.

Kumquat-Riesling Sauce
With more high praise Fine Cooking
February/March 2011

2 1/2 cups Riesling
2/3 cup mild honey, such as clover
1/2 cup granulated sugar
3) 1/4" thick slices peeled fresh ginger
1) 3" cinnamon stick
1/4 vanilla bean, split length, seeds scraped out
12 oz. kumquats (2 1/2 cups), sliced to 1/8" thickness and seeded.

In a 4 quart saucepan, combine the Riesling, honey, sugar, ginger, cinnamon stick, vanilla bean and seeds and 1/4 cup water. and bring to a boil over high heat. Add the kumquats adn reduce the heat to medium-low. Cook until the kumquats are tender and translucent, and the liquid is syrupy, about 30 minutes. Cool and serv at room temperature (or cold if serving with ice cream). the sauce will keep in the refrigerator for about 2 weeks.

Friday, February 4, 2011

Snow Day - Day 2

If one snow day is great then two is better. The first we enjoyed the snow a lot, but the second with crazy low temperatures kept us indoors. When the kids were little we did projects all the time. Not having anyone home during the day and the older kids bailing on me has put a damper on my creative crafty ju-ju. Recently a new friend inspired me to be more crafty. So, Tuesday while the grocery stores were crazy, I did the craft store tour of Randall Road.

The kids have always liked to make their own valentines and a day at home seemed like the perfect opportunity to get a jump on the next holiday. While I was at Michael's I ran into my good friend/neighbor/artist JoAnne. She is a printmaking and paper artist - if it involves either, she's done it. Check out her new blog here. What luck for me - she was chockful of ideas that cost me next to nothing. Thought I'd share a few in case you'd like to make valentines, too.


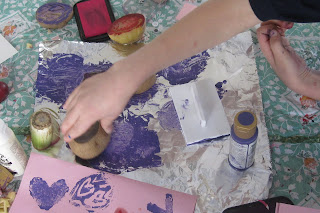
Have you ever done potato printing? Super easy and super inexpensive. JoAnne lent me her cool tools so I didn't have to invest (they were $17 each). They were great for carving designs into potatoes. Never fear, if you don't have an artist neighbor you can cut simple shapes, like X's + O's, above with a paring knife.


Try this as another way to utilize those heart shaped cookie cutters. Press the cutter about half way into the cut side of a potato. Then cut around the cutter with the knife parallel to the flat side of the potato. Great stamps for little hands.


For easy block printing, buy a sheet of medium thick craft foam. Cut it into the desired size then etch the design onto the foam with a dull pencil. Dip into paint or brush with a foam brush and let the printing begin. Be sure not to use too much paint since it will make for a murky print. In the picture above, I used a foam scrap as a make shift handle. Easier to use and, in theory, neater.


We used craft paint and watercolor paper from the stash in the basement. Watercolor paper makes the prints look much more special.


The above was printed after generous dipping in a huge stamp pad left from a kindergarten party craft.


I've done botanical printing with leaves, fruits and vegetables but I've never used celery. Cut a few inches up from the root end and used as stamps in pink and red stamp pads, it creates beautiful roses. I got a little compulsive. Some were stamped directly onto torn edged water color paper.


Some I stamped on scraps and cut out to be collaged or used as gift tags. I'm always thinking about food gift presentation. (more on that coming soon.)

After a busy crafting session, we proceeded to chocolate chip pancakes for lunch,a viewing of Despicable Me. The bright sun came through and there was even some remodeling done to the greatest snow fort EVER. Talk about a great day.

Everyone returned to school today and the house was eerily quiet. To moms with young children, I know some days never seem to end but don't wish them away.

All too soon, they're over.

Thursday, February 3, 2011

Snow Day


Ahhhh, a snow day. A highlight of childhood.


The snow was perfect and the whole family was home.

They dug tunnels.


The neighbor kids of all ages worked together to build "the coolest snow fort EVER."


I think June had more fun than any one. Added bonus, she was too tired to create puppy havoc inside.


Just a bit of snow lining the sidewalk.


I promised Henry an adventure so we walked the 7-11 and the donut shop through 20" of snow. It was really tons of fun!


From the front door.


Somewhere there is a sidewalk.


Henry was the first to volunteer for work. He's trying to dig a path to the hen house.

Yesterday was a great day and today will be another one (detect note of sarcasm). It's too cold to go out and the natives are getting restless. Time for arts and crafts before all hell breaks loose.

Ahhhh, the highlight of every mom's snow day. Sending them back to school.

Tuesday, February 1, 2011

The Blizzard of 20-11


I am so excited. There's a blizzard. School is already canceled. Doug is closing the plant.


Maple syrup candy, snow ice cream, breakfast sausage making. Valentine crafting, movies and playing in the snow. We'll have pot roast and meatloaf and cinnamon rolls, too.

How many days does a snow day last?

Monday, January 3, 2011

2....1....and Now It's The Year!

Two, then one day before Christmas.....

We had an especially lovely dinner with dear friends. Thank you for a really fun evening!


In her spare time, my dearest friend Holly baked all of these wonderful cookies. SHE can make spritz and those tasty Norwegian twists. Her chicken coop kicks butt, too.


Are you a fan of Holmes of Homes on HGTV? Not me, I am a fan of Henry on Homes. If you need any handy work done, call. Don't Grandmas think of the best gifts?


Oh my! A trifle! Don't you wish you had this recipe?


Through the screen door, a Christmas Eve delivery to Margaret.


A houseful of family and lots of good food.


The annual scratching of the lottery cards. Thank you Uncle Jono! We actually won some this year.


A very tired Christmas puppy.


It was a Glee-ful Christmas in the yellow house. They are GLEEKS. Notice the backward "L's"? Irony?


I know they are mine but could they BE any cuter?


I busted out the favorite cookies, cocoa crinkles. Perfect with a cup of Jake's fancy cocoa. I always hide some of these lest there be none for Christmas.


And now the new year is upon us. All good things are ahead. We are healthy and happy and together.

We are so blessed.