Showing posts with label gifts. Show all posts

Tuesday, March 13, 2012

Immunity Solution

Back when my beloved Borders was closing I scored Homemade Soda by Andrew Schloss. After  playing with some root beer and concocting my own herbal sodas last summer this tome of 200 recipes, well, you can imagine how excited I was at the prospects. The first one I attempted, Immunity Solution is nothing like the infamous cure-all, cod liver oil and way less sugar-y than Emergen-C. Full of vitamins A and C, beta-carotene, bioflavnoids and polyphenols you need this as you battle the balance of cold season.


Here we go....pay attention cuz this is really involved. Throw your whole fruit - this recipe calls for blueberries - and juice along with a bit of sweetener, in this case honey, into a pan.


Add a squeeze of citrus for brightness.


Mash the berries to to release flavor then sprinkle over a bit of fresh ginger and cinnamon.


Heat the mixture slowly over low heat, stirring often so the berries release their juice then allow this potion to sit at room temperature before straining through a fine mesh sieve. Discard the solids and store the syrup in a mason jar so it's always at the ready. Pre-mixed in an up-cycled bottle it makes a great gift for under the weather friends. They'll lub you.


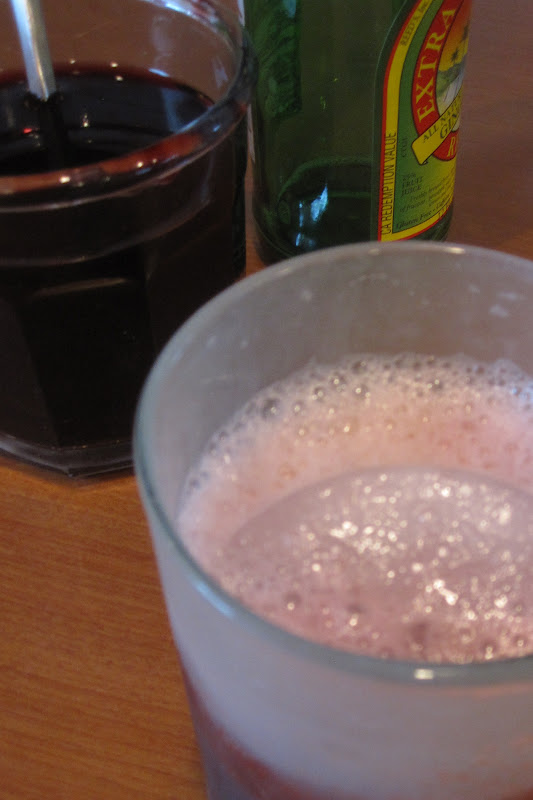
You'll never buy soda again. (except for Pepsi Throwback because, my world would be dim once a month without it). I've also found this healthy habit is really, really good with true ginger beer as an afternoon pick-me-up.

I am also certain the addition of your favorite clear libation would make for a terrific cocktail - with health benefits. Remember these are not just for sickness but in health, too. You'll never look at a cold the same way again.

Achhoooo! Is it 5 o'clock?

Immunity Syrup
Homemade Sodas by Andrew Schloss

1 pt. blueberries or elderberries (I used blue)
1/2 c. carrot juice, preferably fresh
1/2 c. unsweetened purple grape juice
Juice of 1/2 a lemon
1/2 c. honey
1 cinnamon stick, broken into small pieces
1" length of fresh ginger root, coarsely chopped

Combine the berries, carrot juice, grape juice, lemon juice and honey in a small saucepan. Mash the mixture with a vegetable masher (or the back or a spoon), then stir in the cinnamon and ginger. Heat over low heat, stirring often, until the berries have released their liquid. Let cool to room temperature, and strain. You should have about 2 cups of syrup.

This syrup can be stored in the refrigerator for up to 2 days. (though I keep it longer)

Enough for 3 servings

To mix with seltzer:
2/3 c. immunity syrup
2/3 c. seltzer

Pour the syrup in to a tall glass. Add the seltzer and stir just until blended. Add ice and serve.

Yield: 1 serving.

Cheers to health!

Saturday, February 18, 2012

An Ode to Pinterest


I am sure by now everyone is as obsessed, compulsively obsessed, with Pinterest as I am. 

I can think of no better way to while away the hours. So much more productive than Facebook. Inspirational. Is there a more perfect activity at 1am when sleep is elusive? Encouragement to do all of the things you've ever wanted to do. Things on your list since before you had kids, started a business, picked up a part time job, moved, agreed to host your school's fun fair (total lie-they are not fun), dedicated to a work out regime, become the best scout leader ever or masterminded a complete craft/kitchen storage makeover project (just put it on the table down there and I'll (eventually) take care of it)

I love Pinterest.

I love to be crafty and since I've begun to 'pin' I've got my craft groove back. Millions of ideas many of which are fast, cheap and gratifying. Many of which I can't wait to share - just in case you have yet to see them.

For this project, a  run through Goodwill in ten minutes or less with seven dollars, I amassed enough pieces of glass to make five tiny cake stands. Five!

A good scrub in soapy water....


Once thoroughly dry determine what bases, candle sticks or glasses, will be paired with which plates.
I found the bread and butter plates with the etched boarders in a set of four. Two tall, thin taper holders, one with graceful lines and the second sharply cut. Two squat pillar stands, Party Light products probably $19.95 each, cost me $1.98. Mixing up the styles makes for a more interesting grouping but be mindful of scale and proportion.

The biggest investment was the glass and china glue I used to affix top to bottom. This can be challenging and try your patience but persevere, they will hold.  Hint: Don't be stingy with the glue. After struggling with mine, I read E6000 is the way to go. I will definitely use this next time especially now that I've found mine post craft/kitchen storage makeover project.


After a good long drying period the gratification is high....


My original plan was to spray paint them as most 'pins' suggest. I found the clear class appealed to me - maybe because of the etched edge - I originally thought I didn't like. For seven bucks, I can paint one or all someday if it strikes my fancy. An inexpensive way customize a table setting or make a lovely handmade and personalized hostess gift - especially when topped with homemade treats.

Go forth, pin, thrift, create and give. The mess in the craft cabinet isn't going anywhere.

If you'd like to check out  Sweet Sugar Belle's for some color inspiration.

Thursday, January 19, 2012

Memories in the Grocery Store Aisles

Does anyone remember the Brach's bulk bin in the grocery store? Bins of candy bought buy the pound; as a child the temptation to sneak just one was great. The hope mom would give change to put in the locked metal box allowing you to pick was palpable. Sour balls, bull's eyes, Sunkist jellies, root beer barrels, caramels and Neapolitan.

In the summer, my grandmother would host four grandchildren and there was always copious amounts of ice cream. Not just any ice cream - Neapolitan ice cream. Not usually a favorite of mine but she scooped your bowl to order. Lots of chocolate, some strawberry and a little vanilla. At the end, the cardboard half gallon container had deep wells surrounded by the remaining flavor. Just a really cool thing Grandma's can do that a mother never would. It made the ice cream so much more delicious.

It never occurred to me to make Neapolitan candy but when I happened across a recipe I had to try it. So many of my memories are tied to food (or is it the reverse?) and this candy of acquired taste is a fine example.

Especially fabulous if you are a coconut freak, this candy covers all bases with vanilla, chocolate and er...pink. No mind because its striped results are a tasty blast from the past. With all its assumed kitch, the recipe includes vanilla bean seeds. Classy.


Melt white chocolate with sweetened condensed milk and vanilla beans seeds. Be sure to save those pods for the extract bottle or sugar bowl. Once it's melted smoothly, fold in the shredded coconut.


This white love is divided into three parts. One third becomes a lovely shade of pink. The last is flavored with best-quality unsweetened cocoa,


I used an 8x8 pan lined with the wonder-stuff called quick release foil. Chocolate. Vanilla.


Then pink.


After a setting period, it's ready to cut into rectangles and be coveted by old Gen X-ers. My homemade had softer, smoother and more consistent texture. And, just as I recalled from childhood didn't really taste too chocolatey or vanilla-y or pink.

Bummer. In my excitement and Christmas nirvana - I never took pictures of these little goodies cut up and stripey.

But the next time you're at the grocery store, hit up the bulk bins. Don't forget your 33 cents to put in the locked box. They'll look and taste same but with presumably with more filler-crap.

You could make your own by consulting Martha recipe.

Either way, it's worth a walk down memory lane.

Monday, January 16, 2012

On a Creative Roll

In all, 17 people got their gift on in the yellow house for the annual kitchen gifts class last month. Since the second class was rather large, I modified my typical format and set up stations, tastings, examples and mini demonstrations.

One of the best parts of kitchen gifts is the creative wrapping process. I do my best to buy only brown paper and doll it up. A blank canvas to be made hip, sparkly,  rustic or traditional. To that end, I also try to corner the market with every possible cool bit to make conservatively wrapped gifts especially fun. When possible, I like everything to be reusable.

The problem in these classes has historically been how to display the goods without looking like JoAnne and Michael barfed on the table. The answer? Brown paper.


Isn't she clever?


A cohesive display and much inspiration.
Disclaimer:
This post was written well before Christmas and abandon as many of my forthcoming posts were.
I must apologize for unearthing Christmas. It's past, it's done, it's packed away. But since I didn't get this posted in a timely fashion and really wanted to share this idea, here it is. To save myself, I wondered about other applications of this little display and come up with some others....

Gather your goodies and host a winter craft party. Use it to show step-by-step directions for the scout meeting or birthday party craft. Roll out a brown paper table runner at your Superbowl party. Draw out your plays, root for your team, label the snacks, never hear "what is this?" every again.

That alone, is worth it.

Sunday, November 27, 2011

Cake in a Can

Cake is my favorite food. In any shape. In any flavor. Cakes me supremely happy. Supremely. Now that's happy.

When working on my kitchen gifts class for nourish I came across some inspiration via Martha. Big surprise. Cake in a can. Come on.

I also love to recycle tin cans. Remember? How does she get into my head?

Could cake in a can get any better as a sweet gift? Yes. There is beer in it. We're so in tune - Martha and I.

Simple would be an understatement. An easily  tossed together quick cake full of pantry spicy goodness...and stout. Generously buttered 19oz. cans are the baking vessel.


In my excitement to do this project, I grabbed 4 pop-top cans of soup. Without thinking, the proper size was procured but see that little rim? Trouble.


When I explained my situation to my dear in-need-of-distraction-friend Kelli, she directly asked, "Will they come out?" My direct response was "I have no idea."  Long story short they did not and it didn't matter much because I dug them out and ate them anyway. Call it a purposeful illustration for class attendees. Call it an unthinking oversight. Whatever. It's cake.


Per Martha the cakes are removed from the cans, the cans washed and dried and then the cakes are returned to the can for giving. The show must go on and I made my tasty cakes darling for giving. A simple parchment circle punched with a $1 star stamp with a bright green rubber band to secure it. The other can I wrapped in scrapbook paper and placed in a cello bag with a cute handmade tag.

Let's return to the issue of cake. This cake tastes like Christmas. If there were an official taste of Christmas this is it. Really. Plus it's cake. AND it's baked in a can.

First, buy the right kind of can.

Then, read this great blog by a baker with cans of the right size.

Happy Christmas Cake!

Monday, November 21, 2011

Gifts of Love with a Vintage Twist

I love to make kitchen gifts and with every passing year, I buy less and make more. My gifts are anxiously anticipated and make it even more enjoyable to create and package them. This year17 talented people looking for inspiration attended two nourish classes and came away with (I hope) many ideas and the confidence to feed those they love delicious holiday treats.

Though I hope to share lots of my ideas in the coming weeks, I have chosen to start with one of my favorites.
Every year I include a simple chocolate bark recipe. A gift everyone loves and super easy for anyone-regardless of skill level-to make. This year's is dark chocolate, toasted almonds and dried apricots with a sprinkling of smoked sea salt. Sharing this simple yet addictive treat was not the high point, at least not for me.


In this case it's all about the packaging. Rooting through the books at Goodwill, I came across an overly loved copy of Frosty the Snowman and ran to Michael's for a 99 cent half-sized white pencil box. Add to this pairing rubber cement, an Exacto-Knife and a piece of mylar. With some careful cutting the image was dry mounted the lid and covered with mylar to create a frosty (pun intended) look. A few wispy swirls of rubber cement lightly sprinkled with sparkling glitter and Frosty comes to life.

This was my favorite presentation of the year. Combining vintage book images and a decoupage-ish technique - does crafting get any better?

In the end, the recipient has a beautiful keepsake box to enjoy long after the chocolate has affixed itself to the hips. I am sure they'll be especially grateful for the New Year's resolution incentive.

Sunday, October 30, 2011

Thrift Shop + Wool Sweaters = Inspired Gift Wrap

I love to haunt thrift stores. They are so inspiring for projects and finding that kitchy little something you didn't know you needed. One of the things I love to search for are wool sweaters. I love wool - its feel, its smell and the way it looks after being washed in really hot water. The process of felting wool is unusually gratifying. It's as easy as a load of laundry and creates material with endless possibilities.

I am not one to sew. For years my mother told me someday I would wish I had let her teach me how. Of course, she was right. Someday I will learn but for now felted wool fulfills my desire to create with textiles bug. It also appeals to my desire for a math-less world. (sewing seems like a lot of math)

While preparing for the annual Nourish kitchen gifts class, I was in a quandary for a fresh way to doll-up a mason jar. What would make this jar of deliciousness look as good as it tastes? An epiphany. Why not slide on a felted wool wrap in the style of the coffee cup cozies I've made?


For the non-sewing set, this is perfect. I dug out a red cable knit sweater found amongst the beautiful argyle, pale yellow, red-orange and funky striped sweaters I had bought and felted for....I don't know what. Using my super sharp sewing scissors (a gift from my mother) I cut off the cuff just less than half the height (sort of math) of my 1/2 pint canning jar of goodness.


Because I hadn't the forethought (or patience) to cut the sweater apart prior to washing, the seam was a bit bulky. Buttons were the answer. (I love buttons) But sadly, I suck at sewing them on (Doug has to do his own) so I had to rely on Gorilla Glue. Okay, a bit tacky but it worked. I love immediate crafting gratification.


Super cute and potentially even cuter when the buttons are sewn on in a criss-cross fashion with brightly colored, unmatched thread.

Damn. I wish I could sew.

To find amazing inspiration for your felting projects (before you start to accumulate sweaters) read the blog Resweater. For a detailed how-to check out this tutorial.

Happy Thrifting!

Thursday, October 27, 2011

Piles of Plums for Cordial

I know, I know. Plum season lasts about 5 more days. (if you will) Though time is limited, if you can still find them, this delicious sip is worth it on a cold night and the perfect Christmas gift. I bought a ton of plums this season - my fruit compulsion raises it's ugly head....again.

Before their delicious transformation, they were stunning in a vintage orange bowl on the dining table. Lovely.


I decided to make a wine cordial with part of the booty. The appeal of this recipe is allowing the crushed fruit to macerate with the sugar in the fridge for a day. I think I may have taken two with no ill results. As I've said before the multi-step/day processes suit my life perfectly and allow me to attempt things I might other wise pass up.


A bottle of red wine poured into the sweetened fruit and a cup of brandy rounds out the mixture. Back into the pickle jar (Uh, I mean aging container) Thank goodness Grandpa buys the "jumbo" jars of dills for the kids.


Let the fruit infuse the liquid for a few weeks. Once it's done, strain the solids through a sieve gently pressing so you don't lose a drop. An extra straining through butter muslin ensures no bits of pulp in the finished product.


The amethyst color is divine. Sweet and smooth. It warms you to your toes. Before too long we'll really want our toes warm.


Hurry! Go! Buy plums!

Plume Wine Cordial

2 1/2#  plums, pitted and coarsely chopped
2¼ cup sugar
1 bottle of fruity red wine
1 cup brandy

Mash plums and sugar together dissolved. Add plums and all other ingredients to a large jar (pickle size is good) and allow to age for 3 weeks. Shake the jar several times during the resting time. Strain the liquid through a sieve, gently pressing on the solids to extra as much liquid as possible. Pour cordial through a funnel lined with butter muslin in to a clamp top bottle. Let it rest another several weeks. The longer you wait the better it is. An early nip is okay, too.
 

Saturday, October 15, 2011

A Perfect Cup


Isn't it nice to start a blustery fall Saturday morning with a steaming cup of coffee? Even better when brewed with beans from your favorite local coffee house. Can it get any better?

Yes, when it's sipped from a beautiful mug given by a thoughtful friend.

Wednesday, October 5, 2011

CRAVE - Chicago


It's all done. My question and answer portion submitted. The photo shoots finished.

How thrilled am I to be included in the 2nd edition of CRAVE-Chicago?

Let me count the ways....

1. It's a book. I love books.

2. I am considered an entrepreneur. Really?

3. It's full of cool woman doing cool things. It makes me feel like a cool woman doing cool things.

4. I had my picture taken (or made as my friend Kelli says) by a real photographer while doing things I love. The picture part was painful but it was really wonderful to work with the incredibly talented people of Bum Bul Bee Photography. It was a once in a lifetime opportunity. They made me look pretty.

5. It's introduced me to a terrific network of people I am honored to join and look forward to knowing.

6. Sometimes when I look at soon-to-be cover I allow myself to gloat. (only sometimes)

7. It's solidified the thought that what I do is needed and important.

8. The support of dear friends (during the painful parts) has made me realize they are the best of what I've gained from my pursuits.

9. The release party will be a reason to get dressed like a sophisticated adult. Or at least like I used to in the pre-child professional days. (wonder if I can still pull it off?)

10. My family is so very proud. That's the best part.

Wednesday, August 10, 2011

The Basil Chronicles - Part 3 - Infused Sea Salt

And the basil continues to grow...


A couple years ago I made an Rosemary-Orange Salt as part of a kitchen gifts class. It was a highlight and loved by all. It seemed like a natural direction to go in with the basil.


Start with a chiffonade of basil. What's that you may ask? Simply roll the stacked leaves tightly - like a teeny, tiny jelly roll made of basil.


Run your well-honed knife through and you have chiffonade of basil. Fancy.


For infused salts like this I prefer(red) to use the lovely coarse sea salt from Trader Joe's. Alas, they no longer carry it. I hate it when that happens but I am happy I have this one jar left. You can substitute any nice coarse sea salt for the one shown.


Chop the basil further with your knife perpendicular to your initial cuts and let it sit for about 30 minutes. While you wait - zest a lemon or two.


Toss everything into a food processor, blender or mini prep. I like to use the attachment for my immersion blender. It's the prefect size and easy to clean. Give it a few pulses...


...and you have Basil-Lemon Infused Sea Salt.  I chose to keep this one very simply flavored, for tomatoes or fish. Of course you can add anything you like in any quantity you prefer. Peppercorn? Seeds or cumin or fennel? A touch of freshly grated ginger? Basil of different flavors and colors, oregan, dill, sage. Need I go on?

Now is the time to grind up a bunch in all the flavors of the garden. I think a trio of 1/2 pint jars would make a thoughtful gift from your garden. Take a peak at this post for a bit of packaging inspiration from a real dork....I mean, pro.


The hardest part of this project will be giving them away.

Sunday, April 24, 2011

Happy Easter From the Yellow House

May your baskets be over flowing...


Your eggs be brilliant....


Your buns be crossed....


...and your Peeps be most awesome when microwaved!


Happy Easter!

Saturday, April 23, 2011

How To Bribe a 7-Year Old

A gigantic gummy bear on a stick.

Doug and I have never been parents to bribe or spoil with unnecessary crap. Then we had Henry.


Maybe it's because we're older and more tired.

Or perhaps it's because it's fun and in the long run we have really good kids. A little gummy artificial color laden candy won't ruin them.

And they're are only little for such a short time
.

Friday, April 22, 2011

A Perfect Gift


Isn't it lovely to be surprised with a gift? Isn't it especially lovely when some one you really, really like gives you something that was seemingly made just for you? Talk about feeling special.


My dear friend Cheri, surprised me with this vintage cake pan last week. Cake-my favorite food. Chickens - love 'em. Vintage quirky - warms the cockles of my heart.

What a lucky girl I am to have a friend like her.

Friday, February 18, 2011

The Sucker Saga


This year when unpacking the Valentine's decor, I stumbled across a recipe/idea I pulled out of a magazine years ago. Valentine Suckers. Of course, I had to make them for Ella and Henry to attach to their handmade valentines.


The other bonus was a trip to the craft store. I love craft stores. I found Hobby Lobby had the best and most complete selection. It is there one may select from many mold choices and flavorings. Be sure to buy the tempered molds designed for hot sugar. Chocolate molds will not hold up to the 300 degree heat. The flavoring packages include a variety of recipes.


Candy making is fascinating to me. It starts with corn syrup, water and sugar, cooks to 300 degrees, remove from the heat and stir in the flavoring extract or oil and it's candy. Very cool.

Various recipes suggest adding the coloring at various times. Since I used paste coloring and wanted to be sure it was distributed evenly, I added it with the ingredients in the beginning. It worked out fine.


Lightly canola oil sprayed molds at the ready, sticks in place. Since I was unsure exactly how many suckers a "batch" of hot sugar made, I also had two trays of "jewels" to use up the extra. The "jewels" were adorable in cello bags tied with wide satin ribbon for Jake and Max's "girl friends". They also pulled Jake and Max's forgetful friends out of certain Valentine misery. Nice to know they have their buddies backs.


The trickiest part is pouring the hot sugar into the mold. I suggest a glass measuring cup. Work quickly since it cools really fast.


I think they were really adorable. However, I do want to share a few things I leaned on Sucker Street...

#1 - Buy as many molds as you can if you have a ton of suckers to make.

#2 - Realize before you start that 30+23 = 53. If you subtract your own two kids from the equation that's 51. Sucker sticks and bags come in packs of 50.

#3 - 50 is A LOT of suckers.

#4 - Start making your suckers well before the day before the "need by" day.

#5 - While I typically seldom rely on my microwave, in this case it was huge help. Microwave batches are smaller so if you have limited molds, it's the only way to go.

#6 - Cinnamon oil will take the varnish off a wood surface. For real.

#7- Avoid cherry extract at all costs. While it may be tasty in the end, it makes the entire house smell like Robitussin for a very long time. Gross.

#8 - More often than not, my insane projects "for the kids" are my own self destructive path to stress and anxiety. Midway into the path of said anxiety, one must continue forward since it's "for the kids" and I've elevated the suckers to rock star status.

#9 - There is always at least one kids sick on Valentine's Day so stop while you're ahead.


In the end, we had a lovely Valentine's Day gathered around the fondue pot. Much cheese and chocolate were consumed and really, besides love, what else do you need?

Friday, February 4, 2011

Snow Day - Day 2

If one snow day is great then two is better. The first we enjoyed the snow a lot, but the second with crazy low temperatures kept us indoors. When the kids were little we did projects all the time. Not having anyone home during the day and the older kids bailing on me has put a damper on my creative crafty ju-ju. Recently a new friend inspired me to be more crafty. So, Tuesday while the grocery stores were crazy, I did the craft store tour of Randall Road.

The kids have always liked to make their own valentines and a day at home seemed like the perfect opportunity to get a jump on the next holiday. While I was at Michael's I ran into my good friend/neighbor/artist JoAnne. She is a printmaking and paper artist - if it involves either, she's done it. Check out her new blog here. What luck for me - she was chockful of ideas that cost me next to nothing. Thought I'd share a few in case you'd like to make valentines, too.


Have you ever done potato printing? Super easy and super inexpensive. JoAnne lent me her cool tools so I didn't have to invest (they were $17 each). They were great for carving designs into potatoes. Never fear, if you don't have an artist neighbor you can cut simple shapes, like X's + O's, above with a paring knife.


Try this as another way to utilize those heart shaped cookie cutters. Press the cutter about half way into the cut side of a potato. Then cut around the cutter with the knife parallel to the flat side of the potato. Great stamps for little hands.


For easy block printing, buy a sheet of medium thick craft foam. Cut it into the desired size then etch the design onto the foam with a dull pencil. Dip into paint or brush with a foam brush and let the printing begin. Be sure not to use too much paint since it will make for a murky print. In the picture above, I used a foam scrap as a make shift handle. Easier to use and, in theory, neater.


We used craft paint and watercolor paper from the stash in the basement. Watercolor paper makes the prints look much more special.


The above was printed after generous dipping in a huge stamp pad left from a kindergarten party craft.


I've done botanical printing with leaves, fruits and vegetables but I've never used celery. Cut a few inches up from the root end and used as stamps in pink and red stamp pads, it creates beautiful roses. I got a little compulsive. Some were stamped directly onto torn edged water color paper.


Some I stamped on scraps and cut out to be collaged or used as gift tags. I'm always thinking about food gift presentation. (more on that coming soon.)

After a busy crafting session, we proceeded to chocolate chip pancakes for lunch,a viewing of Despicable Me. The bright sun came through and there was even some remodeling done to the greatest snow fort EVER. Talk about a great day.

Everyone returned to school today and the house was eerily quiet. To moms with young children, I know some days never seem to end but don't wish them away.

All too soon, they're over.