Showing posts with label can-can club. Show all posts

Friday, May 11, 2012

Pantry Jam Crumb Cake


I recently came across the notion of depleting ones larder full of preserves from the previous year.  A  revelation! I've been canning since my Grandmother taught me while I was pregnant with Jake. At first, so proud of my preservation projects, I saved them. Some may use the word - hoarded. With years of experience, I've realized each season comes again and with it the joy of preserving more. No need to save (okay, hoard). Give, share, enjoy, repeat.

I am an avid collector of basic buttermilk crumb cake recipes.With berry season barreling down the pike, I took the opportunity to incorporate some of my homemade jam into my favorite kind of cake.

For the first cake, I chose a mixed berry jam full of local blueberries, raspberries and wild blackberries of foraged last summer. The second time around it was strawberry-tarragon. I vote for mixed berry.


Butter, sugar and cinnamon = A delicious crumble topping.


Cake. Delicious, delicious cake.


Only six more jars - of mixed berry - left.


For more idea for using your stock, check out Food in Jars and the Preserves in Action page.

Hurry! Summer is just around the corner.  

My Pantry Jam Crumb Cake

for the cake:
1 1/2 c. all-purpose flour
1/4 t. baking soda
1/2 t. baking powder
1/4 t. kosher salt
1/3 c. butter, softened
3/4 c. sugar
1 egg
1/2 c. sour cream or Greek yogurt
1 t. vanilla extract
8oz. fruit jam of your choice

for the topping
1 1/4 c. all-purpose flour
1/2 c. dark brown sugar
1 t. ground cinnamon
1/2 c. butter, melted

Butter an 8" square baking pan. Pre-heat oven to 350 degrees.

To make the topping
In a small bowl stir flour, sugar and cinnamon. Pour melted butter over and stir into chunky crumbs.

To make the cake
Whisk together flour, soda, powder, and salt. In a large bowl beat butter until fluffy. Add sugar and beat until well combined. Add egg, sour cream and vanilla extract and beat until just smooth. Stir in flour mixture until just combine to form a thick batter.

Smooth the batter into the prepared pan. Dollop jam on top and evenly spread with the back of a spoon. Sprinkle the cake with crumb mixture.

Bake in the center of the oven approximately 40-45 minutes or until a toothpick inserted near the center comes out clean.

Cook in the pan on a wire rack 15-20 minutes.

Lovely warm but equally delicious room-temperature.
 

Tuesday, March 13, 2012

Immunity Solution

Back when my beloved Borders was closing I scored Homemade Soda by Andrew Schloss. After  playing with some root beer and concocting my own herbal sodas last summer this tome of 200 recipes, well, you can imagine how excited I was at the prospects. The first one I attempted, Immunity Solution is nothing like the infamous cure-all, cod liver oil and way less sugar-y than Emergen-C. Full of vitamins A and C, beta-carotene, bioflavnoids and polyphenols you need this as you battle the balance of cold season.


Here we go....pay attention cuz this is really involved. Throw your whole fruit - this recipe calls for blueberries - and juice along with a bit of sweetener, in this case honey, into a pan.


Add a squeeze of citrus for brightness.


Mash the berries to to release flavor then sprinkle over a bit of fresh ginger and cinnamon.


Heat the mixture slowly over low heat, stirring often so the berries release their juice then allow this potion to sit at room temperature before straining through a fine mesh sieve. Discard the solids and store the syrup in a mason jar so it's always at the ready. Pre-mixed in an up-cycled bottle it makes a great gift for under the weather friends. They'll lub you.


You'll never buy soda again. (except for Pepsi Throwback because, my world would be dim once a month without it). I've also found this healthy habit is really, really good with true ginger beer as an afternoon pick-me-up.

I am also certain the addition of your favorite clear libation would make for a terrific cocktail - with health benefits. Remember these are not just for sickness but in health, too. You'll never look at a cold the same way again.

Achhoooo! Is it 5 o'clock?

Immunity Syrup
Homemade Sodas by Andrew Schloss

1 pt. blueberries or elderberries (I used blue)
1/2 c. carrot juice, preferably fresh
1/2 c. unsweetened purple grape juice
Juice of 1/2 a lemon
1/2 c. honey
1 cinnamon stick, broken into small pieces
1" length of fresh ginger root, coarsely chopped

Combine the berries, carrot juice, grape juice, lemon juice and honey in a small saucepan. Mash the mixture with a vegetable masher (or the back or a spoon), then stir in the cinnamon and ginger. Heat over low heat, stirring often, until the berries have released their liquid. Let cool to room temperature, and strain. You should have about 2 cups of syrup.

This syrup can be stored in the refrigerator for up to 2 days. (though I keep it longer)

Enough for 3 servings

To mix with seltzer:
2/3 c. immunity syrup
2/3 c. seltzer

Pour the syrup in to a tall glass. Add the seltzer and stir just until blended. Add ice and serve.

Yield: 1 serving.

Cheers to health!

Wednesday, August 3, 2011

The Basil Chronicles

At risk of sounding like an ingrate, I am having a basil issue. I planted 6 plants as I usually do, but this year I have bumper crop. An exceptionally large, continually growing-by-the-hour bumper crop of basil.

Of course, I've covered the pesto angle. There are 4 1/2 pints in the freezer and I know I'll have to make more to avoid waste but what else is gardener/cook to do? I thought others may be experiencing this problem (whaa~whaa) so I hit the books hard searching for ways to save this precious - and expensive - herb.

One of the most interesting things I came across was carefully layering the leaves in salt. My trial effort involved a small plastic container that's been stored in a lower kitchen cabinet though I've read to refrigerate.


Pretty much it wilted and darkened a bit. The leaves are still tender and hold up to a knife. While the salt doesn't take on any basil flavor (sort of a bummer-I'll be addressing that soon) it can also be returned to the salt box and used for other cooking. Thrifty.....


and brilliant. My plan is to address this project on a large scale at the end of the season. I'll tap my inner pioneer and salt pack the basil.

Then I'll slaughter the hog.

Wouldn't that just freak out the neighbors?

Wednesday, July 13, 2011

Tarragon Pesto for Fish sans Whining

Last week at the market I picked up the most beautiful bunch of tarragon. More of a bouquet than a bunch, it was in a jar on the dining table until I decided I should actually do something culinary with it.


I decided on Tarragon Pesto. The thought of adding it to my eggs or roasting chicken or topping grilled fish is delicious. To have this fresh ingredient at my finger tips for a future fast meal is comforting.

Leaves of tarragon.


Leaves of spinach.


Cloves of Garlic. Smashed.


Pesto recipes usually call for some sort of nut - pine nuts, pistachios, walnuts or even almonds. I used walnuts.


And then olive oil. Since I may end up freezing this, I chose not add the cheese quite yet.


For all intents and purposes - Taaa-Daa - it's pesto!


Pesto is a great way to put off what you can't cook today and can be made out of virtually any herb. I like to put it into 1/4 cup Ball jars and freeze it. For now this jar is living in the fridge but soon, but I hope soon it will grace some grilled fish.

All but one of the children will be out of town so the whining over fish should be minimal. Bonus

Tarragon Pesto

1/4 cup packed fresh tarragon leaves
1/2 cup packed fresh parsley leaves
1 1/4 cup packed fresh spinach leaves
2 T. walnuts
2 large cloves garlic, smashed
3 T. olive oil
2 T. Parmesan cheese

In the bowl of a food processor or blender, place the tarragon, parsley, spinach, nuts and garlic. Pulse until finely minced. Add the oil and cheese, and blend again until smooth.

Store in a container with a tightly fitting lid.

This may be frozen for future use. Defrost before using.

Makes about 3/4 cup


Saturday, June 4, 2011

Let the Pickling Begin

Last weekend, Doug was hard at work with our friend Leslie developing a logo for Double D's, his food company. I had a bit of time on my hands on a dark and stormy day, so I made a small batch of pickled radishes.


I had help. (Doug just asked if I was blogging about the dog - again....)


These couldn't be simpler.


They couldn't look prettier or be more tempting.


Pickled perfection.

Check back for more pickled things soon. We love pickles in the yellow house!

Monday, September 20, 2010

Apple-Palooza


Since I am way not hip enough for any other palooza I've decided to go with apples. This palooza is held in a kitchen and there is an IPOD playing loud and cool music. Really.

There is a woman down the street from me that has two apple trees in her yard that have produced an unbelievable crop this year. In passing one day, Max spoke with her and she told him to take what he wanted, she didn't use them. Did my ears hear that correctly? Didn't use them? Okay, I have no pride when it comes to food so I knocked on her door and sure enough, they were free for the taking.

Do you know anyone that has fruit trees or rhubarb or grapes that just go to waste? There are sights online set up for buying, selling and trading extras. Check out The Farmer's Garden or Veggie Trader and search by location. Unfortunately no one in my area has yet to hop on board but I'll keep checking. At any rate, if you have extra consider giving it a try. Even better, donate to your local food pantry what you know you won't use. Fresh food is often hard for those in a tough situation to come by. I like to think Karen's apples will be packed in many lunchboxes.


I delivered two huge boxes to the food pantry this morning. The bushel I picked for us will be transformed into many apple projects that I look forward to sharing.

I know it'll be tough to wait so in the meantime...

Slice a bunch, toss them into a saute pan with lots of butter, cinnamon and brown sugar. Medium heat and let them go until they are tender and caramelized. Try them as a side or on oatmeal.

Top some premium vanilla ice cream while they're warm.

And I thought I wasn't hip.

Wednesday, September 15, 2010

Something Old Is New

One of the best parts of my job at Williams-Sonoma is getting to test new products as soon as they arrive at the store. One of the worst parts of my job at Williams-Sonoma is having to test new products as soon as they arrive at the store. I hate reading directions. If I have to read directions I don't want to do it. For work, Doug reads the directions and shows me how it works. Lucky, right?

Recently the I was able to experiment with the new Polyscience Professiona Sous Vide. You see them all over the television. A Top Chef/Iron Chef kitchen staple. I must admit I was pleasantly surprised at how easy it was to use. I read the book included by Thomas Keller and felt well prepared. It was fun but not really something I see myself using in my kitchen stadium.

The other part of sous vide is the sealing of the food. Here is where the trouble began. You see, my parents gave me a Food Saver years ago and I had never used it. It seemed too complicated to even have anyone explain it to me. If a basic Food Sealer throws me what are the chances a Caso Vacuum Food Sealer would be in my realm of possibility? Of course, the sous vide class necessitated my learning. Thanks to Doug, it was a breeze. What does this say about me I wonder? Not the sharpest knife in the block?


I felt so empowered after mastering the super cool model from W-S, that will seal liquid, I felt fully prepared to learn to use the lonely, untouched Food Saver in my make-shift pantry.

Peaches, tomatoes, rhubarb, corn, pre-soaked white beans and a loaf of polenta is all I can say.

What can I seal next?

Sunday, September 12, 2010

All In The Family Tomato-Basil Sauce

Labor Day weekend on utter impulse, I brought home 40# of tomatoes from the Geneva Green Market. A deal I couldn't pass up and a chance to do a little sauce making. I do a lot of canning but have never done any sort of tomato preservation beyond freezing and oven drying. Now I had my opportunity - a heavy opportunity.


What began as a solitary endeavor soon became a family project much to my relief. Everyone pitched in cross-hatching, blanching and peeling.


Even Cousin Lauren, staying with us for the weekend was forced into service. Thank you, Lauren!


I am not such a task master - rest assured there was lots of fooling around...


Eventually peeled tomatoes surpassed unpeeled and we were able to get cooking.


I sauteed onions, LOTS of fresh local garlic (you really must track some down before it's too late.) And a good dose of red wine and the tomatoes.


I decided two use to pans (of completely different type) to facilitate the cooking. They bubbled for a good long while.


Still having a love affair with my basic model food mill, with Jake's help I was able to puree it all to a moderately smooth texture before returning it to the stove to further reduce and develop great flavor. At the end of the cooking time, I added generous handfuls of chiffonade of basil from my garden.


Ultimately, we wound up with 6 1/2 quarts of sauce from what I guessed to be about 30# of tomatoes. Another 5# pounds became grill roasted salsa a la Doug and the balance was roasted with onions and garlic to be pureed into soup on an overly busy, cold day.


Don't they look lovely?


I did can the sauce in a hot water bath per the cookbook's instructions and meticulously followed the bible of canning, The Blue Ball Book. I've read that it's difficult to can safe tomato sauce but Williams-Sonoma said I could. They can't be wrong, right?

Tomato-Basil Sauce

from The Art of Preserving by Rick Field and Rebecca Courchesne

1 T. olive oil
4 yellow onions, coarsely chopped
6 cloves garlic, chopped
10# tomatoes, cut into chunks (I chose to peel them, too)
1/2 cup dry red wine, optional (come on!)
1/2 cup finely chopped fresh basil
1/4 cup fresh lemon juice (I chose to use bottled lemon juice to ensure the proper acidity level)
1 1/2 t. salt
1/4 t. ground pepper

Have ready hot, clean jars and their lids. (consult the Ball sight for specific instructions, if needed.)

In a large non-reactive saucepan over medium heat, warm the oil. Add theonions and cook, stirring occasionally, until translucent, 5-7 minutes. Add the garlic and cook, stirring 2 minutes longer

Add the tomatoes and wine, if using. Raise the heat to high and bring to a boil. Reduce the heat to medium and simmer, uncoverd stiring occasionally, until reduced by half, about 1 hour.

Pass the tomato mixture through a food mill or coarse-mesh sieve over a clean, large nonreactive sauce pan. Gring to a boil over medium-high heat. Reduce the heat to mediucm-low and simmer until the sauce reaches the desired consistnecy. Stir in the basi, lemon juice, salt and pepper. Tast the sauce and adjust the seasonings.

Ladle the hot sauce into the jars, leaving 1/4" of headspace. Remove any air bubbles and adjust the headspace, if necessary. Wipe the rims clean and seal tightly with the lids.

Process the jars for 30 minutes in a boil water bath. (again, check the Blue sight for specific instructions, if needed) The sealed jars can be store in a cool, dark place for up to 1 year. If a seal has failed store the jar in the refrigerator for up to 2 weeks.

Yield: 6) one pint jars

Wednesday, September 8, 2010

Putting Up

I haven't posted anything in awhile. That makes me sad. I have, however, been very busy stocking the shelves and want to share.

Canning, preserving, putting up, putting by. Whatever you choose to call it, I love it. It meshes perfectly with my compulsive tendencies. You didn't realize I tend to be compulsive?

It started, as it does every season with the Smitten Kitchen pickled sugar snaps. A quick pickle that doesn't stick around long here. While I didn't process them, I think they looked super cute in the fridge in this glass jar.

Every spring there are lots of garlic scapes at the market. The stem and flower of hard neck garlic, they're so tasty. Last year I made pesto with them. A bright spring green with a mellow garlic flavor. Lovely. This year I pickled them.


I also made sweet pickled wax beans. There was recipe in the Everyday Food that caught my eye. I only made two pints worth and have yet to taste them since they need to cure. How can any pickled be bad?


Nice cutting board you say? Jake made it for me.


Pickles. Pretty much the only wildly successful aspect of my garden. Needless to say, I've made lots and lots of pickles this year.The old stand-bys and....

...my first batch of bread and butter pickles. Extra onions. Lucky for me, I am the only one that eats these.


Mixed berry jam. It's delicious and will be an extra special treat in January.

There is also jalapeno jelly, the apricot selection, hot and mild salsa. Grape juice from my vines is waiting to be turned into jelly, garden beets to pickle and a bunches of peaches to that will become...something. Autumn raspberries are ready to be picked, too.


And then there are tomatoes. A local farm had a sale on tomatoes. Can you imagine my good fortune? I made lots of things with these wonderful heirloom varieties. I need to share the tomato-basil sauce that started with an impulse buy of 40# of romas. That's a story for another time.


I turned those gorgeous tomatoes into Spicy Tomato Jam. If your tomatoes are fabulous or your market is overflowing, you really must try it on a panini or as an accompaniment to a cheese plate. I promise you'll love it.

Spicy Tomato Jam
based upon the recipe from Farm To Fork by Emeril Lagasse.

4 cups seeded and chopped ripe tomatoes (about 2 1/2-3#)
I did not peel them. Heirloom skins are so thin they aren't noticeable & added nice texture
2 lemons skins peeled away entirely, seeds removed and flesh finely chopped
1 1/2 cups sugar
2 generous T. fresh ginger
1/2 t. crushed red pepper
1/2 t. salt

Combine all the ingredients in a preserving pan and bring to a boil. Lower the heat to a brisk simmer and continue to cook, periodically skimming any foam that develops on the surface. Stir frequently until a think jam-like consistency is achieved. This may take 35-45 minutes. Be sure to stir constantly in last ten minutes to ensure jam doesn't burn on the bottom of the pan.

Transfer the hot jam to hot sterilized jars leaving 1/2" head space, release any air bubbles by running a skewer around the sides of the jar, wipe the rims clean and attach the lids and rings.
Process in a hot water bath for 230 minutes.

Remove from hot water bath and allow to rest on the counter, undisturbed until completely cool.

A full tank of gas, new book of stamps and food in jars. What more can you want?

Friday, August 27, 2010

I Say Heirloom Tom-aahhh-to!

A few posts ago I lamented my tomato situation. Big beautiful plants, slowly succumbing to blight. Huge green fruit, full of promise refusing to turn the rosy pink or brilliant green and yellow they are intended to be.

Faced with the prospect of no tomatoes in January, imagine how thrilled I was to get an email announcing the TOMATO SALE, at a local farm, Heritage Prairie Farm. Someone up there, somewhere is looking out for me.

Grab your apron, we're making Spicy Tomato Jam.


I've made this recipe twice. The first time for a canning class I taught. I used all red tomatoes since I wanted the acid they provide and it was wonderful. The second time around, based upon availability I used a selection of red, yellow and green.


This recipe is from Farm to Fork by Emeril Lagasse. Not usually a fan of the "bam" man, I admit, I LOVE this cookbook. So much so in fact that I keep renewing it's library status, hogging it from others. Maybe I should just buy it.

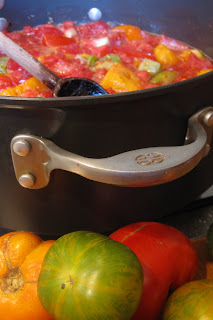
Lots of tomatoes, fresh ginger, two whole lemons and a bit of spice thrown in a pan to cook.


Heirloom tomatoes are sometimes called ugly. I think they are what a real tomato should look like. Somehow, even a homegrown hybrid just looks.....fake?


I like to use my 10 quart Calphalon pot for preserving. It's broad across the top to allow for evaporation, key when making jam -especially with juicy fruits.


I usually like to use a thermometer for jam, just to make sure I don't over cook it. In the case of this recipe, it's really not necessary. The directions suggest stirring often in the last 10 minutes of cooking which is really important. Stirring with a silicone spatula will make it obvious when the proper consistency has been reached.


I found it delicious directly off the spoon. That said, the possibilities with this are endless - bruschetta, grilled meets, cheese platters, sandwiches and panini. What more could you want out of a jam?

Spicy Tomato Jam
adapted from Farm to Fork by Emeril Lagasse

4 (about 2 1/2-3#) cups peeled, seeded, and chopped ripe tomatoes - I suggest all heirlooms and no paste tomatoes. I didn't peel the tomatoes and found the thin heirloom skins weren't noticeable)
2 lemons, peel cut entirely away and discarded, seeds, removed, flesh finely chopped (I tried to remove some of the tougher segments)
1 1/2 cups sugar
2 T. minced fresh ginger (I used the microplane and added a touch more the second time around)
1/2 t. crushed red pepper (adds the prefect bit of heat - don't be tempted to skip it!)
2 pinches salt

Combine all the ingredients in a medium saucepan and bring to a boil. Lower the heat to a brisk simmer and continue to cook, periodically skimming off any foam that forms on the surface and stirring frequently, until a thick, jamlike consistency is achieved and most of the liquid has evaporated, 30-35 minutes. (Stir more frequently during the last 10 minutes so the jam does not burn on the bottom of the pan)

Transfer the jam to hot sterilized jars, filling the jars to within 1/2" from the top and attach the lids and rings. (At this point you may process in a hot water bath for 10 minutes to make the jars shelf stable. Check this website for canning basics if you've never canned before)

Once they have cooled, store the jars in the refrigerator for up to 4 months. (Alternatively, place the jam in covered non-reactive containers and store in the refrigerator for up to 2 weeks.

Yield: 1 generous pint, 2 8oz. jars