Showing posts with label we made.... Show all posts

Saturday, October 29, 2011

A Boo Blog

In need of a last minute Halloween treat to keep little hands busy this weekend? Henry's scout group recently came over for a meeting and spooky fun. In need of easy crafts and projects, I was inspired by an overwhelming collection of white chocolate. A quick trip to Michael's for sucker sticks and I was ready for 7 little boys to wreak havoc.

Melt the white chocolate in the microwave with a one tablespoon of vegetable oil per 12 ounces of chocolate. The oil allows for smoother melting and give the finished project softer bite.

A blob of white chocolate was placed on each boys sheet of parchment paper and they set about creating their ghost with the back of a small spoon. Of course, an off-set spatula makes this a bit easier but everyone has lots of spoons, right?


Once the shape is just right, a stick is spun in the chocolate to affix it and a nice, big brother goes back and adds a bit more to glue it in place.

Two chocolate chip eyes (or several) and a (or many) red hots for gaping mouth (or more eyes) and it's very spooky. Allow it to cool at room temperature or to speed the process, put it in the fridge or freezer.


BOO! It's a chocolate ghost sucker!

Have a happy and safe Halloween with your little goblins.

Friday, October 14, 2011

Little Skywalker's Eggs

Henry is a hard core Star Wars fan. He knows the characters and the plots. He knows which one is number one and which one used to be number one but is now number six. Amazing.

It's fairly typical for there to be many very large Star Wars books around that he's hauled home from the library. This last time, he brought a cookbook. Finally, Star Wars on a level I can understand - or so I thought.

After reading through the book Hen decided he would make Twin Sun Toast for breakfast one morning before school.


He read through the recipe and gathered the ingredients. He decided we should use Lily's eggs since they are smaller. I glanced at the recipe - not really paying too much attention. It's a kid's book, right?


My fancy $5 circle cutter set was pressed into service. These are the sun holes. Junie got the insides.


He pre-heated.


He carefully broke the eggs.


He seasoned.

Despite his care and my cooking experience it didn't work for a few reasons. The eggs - any eggs, (even Lily's) are way to big for the holes - if you want it to look like the picture. The instructions don't include toasting one side of bread in the pan before flipping it over to add the eggs. In the picture the top of the bread is very toasty.

After realizing the flaws I overlooked, I told my very sad little Skywalker, I would make it with a few modifications.


Bottom line - it can't be made without copious changes to the recipe for it look remotely like the picture. Kids want expect it to look like the picture. And it should. No cook book should be this way.

When attempting a recipe or selecting a cookbook any cook, should read carefully and thoughtfully, sometimes they aren't right. Sometimes it takes more than once to figure that out. He was so very disappointed. Sad eyes over Twin Sun Eggs are a horrible way to start the day.

We won't make this mistake when we make our R2D2 treats.

Now, is he the gold one or the one that looks like a garbage can?

Thursday, August 11, 2011

Jim Gaffigan in the Kitchen


Have you ever heard Jim Gaffigan's bit about Hot Pockets? It's hilarious and of course, every time I utter the words, probably only while in conversation with Jake, I find myself reciting them in an off key warble.

Last summer Jake ate (not had - watch the video) his first Hot Pocket at a friend's house. To say the least, I was mortified - have you ever read the label? I told him then and there I could make a better Hot Pocket. A homemade Hot Pocket.

I've made them a few times in the past. Lately I've begun to feel nest-y and frugal since school is starting. Making a bunch of them for future lunches seemed a good thing to do.


I admit to using purchased pie dough. It was around for experimental reasons. (seriously) If I don't make it (usually just for work), I buy it at Trader Joe's. It's really pretty good and made with all butter.


You can roll them into rounds, cut them into squares or use a nifty hand pie mold from my favorite kitchen equipment store. I baked an inexpensive ham slice and cut it into pieces then tossed it with cheddar and Swiss cheeses. My original intention was to saute some green onions but - I forgot.


Run a damp finger around the edge of the bottom crust before draping the filling with the top crust.


This helps prevent gooey cheese leaks, too.


A neat little pocket, pie or pasty.


Press the edges with a fork.


Vent it so the top doesn't blow.


This is definitely a time to use the silpat for easy clean up.


It's probably not a good idea to put them in the oven straight away. I let them firm up in the fridge a bit first. I made a whole bunch of them and froze them thinking once school has started, I can bake them off and send them in lunch boxes.


They are Henry Approved.

A few things. No, I didn't make the crust, and yes, I forgot to add "aromatics" and I could have spent more time putting them together and added a nice glaze to ensure a super golden brown crust perfect for photography.

But really, they are just Hot Pockets.

At least they won't be cooked in a dirty microwave.

Watch the video.

Wednesday, June 1, 2011

Memorial Day Relief


Last weekend was a fairly typical Memorial Day in the Midwest. Rain - there is always rain. Monday, when the rain let up long enough for the sun to kick the humidity up to an oppressive percentage the only thing to do was make summery cocktails.

Remember way back, when I took one of these.....


...and shoved in a jar full of rum and ginger? This was the inspiration for our cocktails - that and the free app on my phone.


Pineapple-ginger infused rum, fresh pineapple, creme de coconut and ice. A spin through the Vita-Mix and....


Frosty, sweet respite.

Tuesday, March 8, 2011

Miracle Whip or Mayo?


One of the great debates that has spanned decades of American culture - Miracle Whip or Mayo? You may gasp or be shocked and appalled but I come from Miracle Whip. That's what was in the fridge when I was young and so that was the condiment of choice. I held pretty firm on that and once married we became a multi-egg based condiment household. With age I've realized there are things that fade or become less important and Miracle Whip is one of them.

My kids are mayo kids and though occasionally there is a jar of "sandwich spread" in the fridge it's not often. If pressed, I guess I 'd have to say Hellman's is the one to buy. What I really like is the homemade version.

We/Doug got a fancy new Vita-Mix for my/our/his kitchen at Christmas time. He/I needed it to make hot sauce/lots of fabulous stuff. He teases me often about "his" Vita-Mix. I'll let him have the Vita-Mix but the kitchen is still my domain. Anyway, homemade mayo in a Vita-Mix is a wonderful thing.


Of course this is where I insert information about the freshest and best quality food. Thanks to my girls my mayo rocks. Seriously. To be safe, I would always suggest you search out pastured eggs from a reputable area farmer. Since the eggs are uncooked this is the ultimate case for clean food and not the best choice for young children or those with deficient immunity. Let common sense prevail.

A few simple ingredients mixed together then a slow drizzle of oil is all you need for sandwich nirvana. No you don 't need to have a Vita-mix. A blender works perfectly. A food processor works well for a bit larger quantity. Of course, all you really need is a whisk and a strong arm.


No, this photo is not re-touched and no, I didn't add yellow food coloring. Amazing, beautiful mayonnaise that is light, lemony and full of easily pronounced ingredients some of which came from my own back yard.

Just in time, too. We're out of Mir-a-cle Whip!

Homemade Mayonnaise
How To Cook Everything by Mark Bittman
method slightly annotated

1 egg or egg yolk, a whole egg will result in a lighter mayo
dash cayenne
1/2 t. dry mustard
salt and freshly ground pepper to taste
2 T. freshly squeezed lemon juice
1 cup extra virgin olive oil or canola oil (for aioli* I use olive oil otherwise canola)

Combine the egg, cayenne, mustard, salt, pepper, lemon juice and, 1/4 cup of the oil in the container of a blender or food processor; run on the machine and, with the machine running, add the oil in a thin, steady stream.

After you've added about 1/2 of the oil, the mixture will thicken (emulsify); then you can begin adding the oil a bit faster. When all of the oil has been added, check the seasonings and refrigerate for up to a week.

*aoili or garlic mayonnaise is a traditional French accompaniment. Wonderful with fish or vegetables or as a sauce for any cooked food. Add 1 to 4 whole peeled cloves of garlic at the beginning.

Sunday, February 20, 2011

Many Tamales


I think I've shared that I don't have much of a calling to cook Mexican food. (remember?) I have a great calling to eat it though and it's yet another reminder to be so thankful for my spouse. As is tradition for many Mexican families, in the yellow house tamales are a Christmas tradition. Time got away this year and our tamales didn't arrive until a few weeks ago but they were fabulous and even better than last year.

Before he's tried to make them start to finish in one weekend. This year he approached it differently, and broke the process down - meat one weekend and assembly the next. Much better.


Tamales are little packets of meat or vegetable surrounded by masa harina then wrapped in corn husk to steam. Masa, a bit of water and lard mixed together to form a soft dough. Let's not dwell on the lard.


Through trial and error, Doug's learned to tweak the dough until it feels right. The recipes tend to be a bit stiff and dry and a softer dough makes the wrapping easier and creates a more tender end result.


Ironically, the most expensive part of this project seems to be the corn husks. At the corner store a package runs about 5 bucks which seems absurd. My guess is they might be a bit less costly at a Mexican market.


Soaking corn husks, slow cooked shredded pork and corn dough ready to go.


A layer of corn dough goes onto the husk first. Ladies with many, many tamales under their belt seems to slap these together with a flick of the wrist. Doug's still working on his technique and it's getting smoother with every batch.


Meat goes on next. He likes to use a nice amount of meat since sometimes they can be a bit skimpy. That can be disappointing.


Sides folded in and top up. Traditionally, they are tied with a small strip of husk. This time around Doug skipped it. They look really nice tied up but it takes a lot of time. He's streamlined my contribution right out of the process!


The steaming of the tamales takes 2 hours. We use our pasta pentola, since the extra deep strainer allows many tamales to be set in vertically. Far more efficient than a vegetable steaming basket.


They are especially delicious and they go quickly once they're done. Some are eaten, some are frozen and many are given away. This last week, lots were shared at an employee meal in Doug's plant. The best compliment of all was from the Mexican ladies claiming they were amongst the best they've had. I believe them.

Even if Lupe has a huge crush on my husband.

Friday, February 4, 2011

Snow Day - Day 2

If one snow day is great then two is better. The first we enjoyed the snow a lot, but the second with crazy low temperatures kept us indoors. When the kids were little we did projects all the time. Not having anyone home during the day and the older kids bailing on me has put a damper on my creative crafty ju-ju. Recently a new friend inspired me to be more crafty. So, Tuesday while the grocery stores were crazy, I did the craft store tour of Randall Road.

The kids have always liked to make their own valentines and a day at home seemed like the perfect opportunity to get a jump on the next holiday. While I was at Michael's I ran into my good friend/neighbor/artist JoAnne. She is a printmaking and paper artist - if it involves either, she's done it. Check out her new blog here. What luck for me - she was chockful of ideas that cost me next to nothing. Thought I'd share a few in case you'd like to make valentines, too.


Have you ever done potato printing? Super easy and super inexpensive. JoAnne lent me her cool tools so I didn't have to invest (they were $17 each). They were great for carving designs into potatoes. Never fear, if you don't have an artist neighbor you can cut simple shapes, like X's + O's, above with a paring knife.


Try this as another way to utilize those heart shaped cookie cutters. Press the cutter about half way into the cut side of a potato. Then cut around the cutter with the knife parallel to the flat side of the potato. Great stamps for little hands.


For easy block printing, buy a sheet of medium thick craft foam. Cut it into the desired size then etch the design onto the foam with a dull pencil. Dip into paint or brush with a foam brush and let the printing begin. Be sure not to use too much paint since it will make for a murky print. In the picture above, I used a foam scrap as a make shift handle. Easier to use and, in theory, neater.


We used craft paint and watercolor paper from the stash in the basement. Watercolor paper makes the prints look much more special.


The above was printed after generous dipping in a huge stamp pad left from a kindergarten party craft.


I've done botanical printing with leaves, fruits and vegetables but I've never used celery. Cut a few inches up from the root end and used as stamps in pink and red stamp pads, it creates beautiful roses. I got a little compulsive. Some were stamped directly onto torn edged water color paper.


Some I stamped on scraps and cut out to be collaged or used as gift tags. I'm always thinking about food gift presentation. (more on that coming soon.)

After a busy crafting session, we proceeded to chocolate chip pancakes for lunch,a viewing of Despicable Me. The bright sun came through and there was even some remodeling done to the greatest snow fort EVER. Talk about a great day.

Everyone returned to school today and the house was eerily quiet. To moms with young children, I know some days never seem to end but don't wish them away.

All too soon, they're over.

Saturday, January 22, 2011

The Ultimate Taco Project - Corn Tortillas


We in the yellow house really like Mexican food. Doug makes great fish tacos exceptional tamales and really good guacamole. When it comes to cooking Mexican food, I like to leave it to Doug. It's one of those meals I don't cook. I am, however, very good at cutting limes, opening Coronas and making Chillatas.

Summer of 2009 we worked all season on The Ultimate Burger Project. (Check out the first post here.) Summer 2010 was a blur and there were no projects that really called to me. And then I decided the Ultimate Taco Project needed to be addressed. While as stated above, much of the work will be in Doug's hands there are a few things I'll be bringing to the table.

Case and point...

Corn tortillas!


We had talked for a looong time about making our own and then talked a loooong time about purchasing a tortilla press. This required a trip to Sur La Table (gasp!) and recently, I finally got around to it. Side note: W-S now carries a press, same price, online only. Just sayin'.


They couldn't be easier. The toughest part is getting to a Sur La Table. (gasp!) Anyway, masa harina, salt and water. Masa harina, is "the Spanish word for "dough", masa is the traditional dough used to make corn tortillas. It's made with sun-or fired dried corn kernels that have been cooked in lime water( water mixed with calcium oxide). After having been cooked and soaked in lime water overnight, the wet corn is ground masa. Masa harina literally "dough flour", is flour made from dried masa." Gosh, I love The Food Lover's Companion! I need to be thorough, after all, my involvement in this project is limited.

I won't include a recipe since most are very similar and you'll find one on the back of the flour bag. I will share a few tips I've picked up through reading and experience, albeit limited.
When making the dough add water judiciously. It should stick together like Play-Doh but not be too sticky.


If you find it's too dry as you break it into pieces, wet your hands to add a bit more water to the dough and prevent it from sticking. Keep the portions covered with a damp flour sack towel to prevent the dough from drying out. Smash dough slightly before placing it into the press. For a 4" tortilla you need about an ounce of dough. Larger tortillas obviously require a bit more, maybe 1 1/2 to 2 ounces.


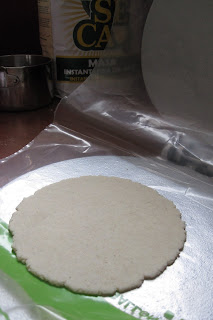
Place the dough ball onto the tortilla press that's been lined with a plastic bag. Use a ziploc bag rather than plastic wrap, it's easier to manage. I cut the bag so it opened like a book, placed the bag in the press with the "binding side" to the back of the press. When I was done, I left the bag, wiped of crumbs in the press to use again the next time.


As you press them, pop them into a super hot cast iron pan. Take a few minutes to tap them gently with your finger tips between flips to create air pockets for a light tortilla. As they finish, place them on a flour sack towel to cool but stay moist. You can use them right away or wrap them in plastic wrap to prevent them from drying out in the fridge.


Ready to fill.


Before we ate them with some fast pork tacos, we tossed them onto the gas burner to warm and brown them up a bit. They were delicious and far superior to anything I've ever bought.

Next up? Flour tortillas.

Horchata, too. You've gotta drink horchata with a spicy taco.

Check back soon.

Thursday, January 13, 2011

Sausage Making 101


For awhile now Doug and I have talked about making our own sausage. So for Christmas, I bought him a sausage making book and the stuffing attachment for the Kitchen-Aid. After a trip to Costco, we were ready to give it a shot.

Andouille and Chicken, Apple, Chardonnay were the choices for this go. Never one to do things small, Doug doubled the recipes. FYI - it takes a loooong time to make 18# of sausage.


The andouille, of which we made the most, required lots and lots of onions and garlic. Chopping it all was my job.


Freshly ground black pepper (love my new spice mill), thyme, cayenne and salt pumped the flavor up.


The base meat is pork, specifically pork shoulder with a bit of added pork fat. About 80% meat to 20% fat.


It was then all pushed through the food mill attachment. That was Doug's job. Extreme patience, strength, height and a stubborn streak were key attributes for a really tedious job. He's the best.


After the meat is ground, the aromatics are added, mixed together well and chilled.


Next up, chicken. The recipe calls for chicken thighs, which I think are highly underutilized. They are perfect for sausage because of the extra fat. Fat = Flavor, right?


Added to the chicken, chardonnay, granny smith apples, salt, pepper and a bit of ground ginger.

Ready for stuffing. It a took a bit of time to execute this key aspect of our project. Trial and error taught us the hardest part is keeping the process moving with a rudimentary stuffer and the colder the meat the easier it is. My job was to keep the casing moving and twisting the links. I am not good at twisting the links. The Andouille was tied with twine and that was way easier.


Is there anything more thrilling to make cool food from scratch?


The chicken sausage, to be eaten fresh is wonderful. The ginger, which Doug was concerned about was very subtle and the texture just right.

After stuffing, the Andouille was smoked by the King of the Smoker. To say that it is phenomenal is an understatement. Boy is he talented.


We rock. We now have a freezer full of sausage and can't wait to make more. I am thinking one, just one, batch of bulk maple breakfast sausage sounds perfect for a Sunday morning.